Taichi编程语言
为什么选择一门新的编程语言
太极是一种用于计算机图形应用的高性能编程语言。其设计目标有:
- 生产力
- 性能
- 可移植性
- 空间稀疏计算
- 可微编程
- 元编程
设计决策
- 解耦计算与数据结构
- 领域特定编译器优化
- 大核心
- 双尺度自动微分
- 嵌入Python
安装 Taichi
很容易通过 pip 安装 Taichi :
python3 -m pip install taichi
注解
目前,Taichi 支持的 Python 版本有 3.6/3.7/3.8 (64-bit)。
- 对于Ubuntu 19.04+,请执行
sudo apt install libtinfo5安装依赖项。 - 对于Arch Linux,请执行
yaourt -S ncurses5-compat-libs安装依赖项。 - 对于 Windows,请预先安装运行组件库 Microsoft Visual C++ Redistributable .
故障排除
Windows 相关问题
- 如果在 Windows下 Taichi 崩溃并报告
ImportError:请考虑安装运行组件库 Microsoft Visual C++ Redistributable 以进行解决.
Python 相关问题
如果
pip报错找不到合适的包,即,ERROR: Could not find a version that satisfies the requirement taichi (from versions: none) ERROR: No matching distribution found for taichi
确保你使用的 Python 版本是 3.6/3.7/3.8:
python3 -c “print(__import__(‘sys’).version[:3])” # 3.6, 3.7 或 3.8
确保你安装的 Python 可执行文件是 64-bit:
python3 -c "print(__import__('platform').architecture()[0])" # 64bit
CUDA 相关问题
如果 Taichi 报告以下崩溃信息:
[Taichi] mode=release [Taichi] version 0.6.0, supported archs: [cpu, cuda, opengl], commit 14094f25, python 3.8.2 [W 05/14/20 10:46:49.549] [cuda_driver.h:call_with_warning@60] CUDA Error CUDA_ERROR_INVALID_DEVICE: invalid device ordinal while calling mem_advise (cuMemAdvise) [E 05/14/20 10:46:49.911] Received signal 7 (Bus error)
这可能是因为你使用的 NVIDIA GPU 低于 Pascal 架构,这对 统一内存(Unified Memory) 会有限制。
- 解决方案: 尝试添加
export TI_USE_UNIFIED_MEMORY=0到~/.bashrc。该操作将禁用CUDA后端使用统一内存。
- 解决方案: 尝试添加
如果你遇到了其他 CUDA 相关问题,不要气馁:
- 解决方案:尝试添加
export TI_ENABLE_CUDA=0到~/.bashrc。该操作将完全禁用CUDA后端,这样Taichi会依赖于其他GPU后端,如OpenGL。
- 解决方案:尝试添加
OpenGL 相关问题
针对 Taichi 打印出的调用栈(stack backtrace)中包含
glfwCreateWindow等信息的情况(更详细的问题描述请对照 #958):[Taichi] mode=release [E 05/12/20 18.25:00.129] Received signal 11 (Segmentation Fault) *********************************** * Taichi Compiler Stack Traceback * *********************************** ... (many lines, omitted) /lib/python3.8/site-packages/taichi/core/../lib/taichi_core.so: _glfwPlatformCreateWindow /lib/python3.8/site-packages/taichi/core/../lib/taichi_core.so: glfwCreateWindow /lib/python3.8/site-packages/taichi/core/../lib/taichi_core.so: taichi::lang::opengl::initialize_opengl(bool) ... (many lines, omitted)
这很可能是因为你运行 Taichi 的虚拟机上的 OpenGL 版本过低。Taichi 需要 OpenGL 4.3+ 才能工作。
- 解决方案: 尝试添加
export TI_ENABLE_OPENGL=0到~/.bashrc。该操作将禁用OpenGL后端检测,以避免OpenGL版本不兼容的问题。
- 解决方案: 尝试添加
Linux 相关问题
If Taichi crashes and reports
libtinfo.so.5 not found:On Ubuntu, execute
sudo apt install libtinfo-dev.On Arch Linux, first edit
/etc/pacman.conf, and append these lines:[archlinuxcn] Server = https://mirrors.tuna.tsinghua.edu.cn/archlinuxcn/$arch
Then execute
sudo pacman -Syy ncurses5-compat-libs.
If Taichi crashes and reports
/usr/lib/libstdc++.so.6: version `CXXABI_1.3.11' not found:You might be using Ubuntu 16.04, please try the solution in this thread:
sudo add-apt-repository ppa:ubuntu-toolchain-r/test -y sudo apt-get update sudo apt-get install libstdc++6
你好,世界!
我们将通过一个分形程序的例子来介绍 Taichi。
Running the Taichi code below (python3 fractal.py or ti example fractal) will give you an animation of
Julia set:

# fractal.py
import taichi as ti
ti.init(arch=ti.gpu)
n = 320
pixels = ti.var(dt=ti.f32, shape=(n * 2, n))
@ti.func
def complex_sqr(z):
return ti.Vector([z[0] ** 2 - z[1] ** 2, z[1] * z[0] * 2])
@ti.kernel
def paint(t: ti.f32):
for i, j in pixels: # 对于所有像素,并行执行
c = ti.Vector([-0.8, ti.sin(t) * 0.2])
z = ti.Vector([float(i) / n - 1, float(j) / n - 0.5]) * 2
iterations = 0
while z.norm() < 20 and iterations < 50:
z = complex_sqr(z) + c
iterations += 1
pixels[i, j] = 1 - iterations * 0.02
gui = ti.GUI("Fractal", (n * 2, n))
for i in range(1000000):
paint(i * 0.03)
gui.set_image(pixels)
gui.show()
让我们来深入剖析一下这段简单的 Taichi 程序吧。
import taichi as ti
Taichi 是一种嵌入在 Python 中的领域特定语言(Domain-Specific Language, DSL )。为了使 Taichi 能像 Python 包一样易于使用,基于这个目标我们做了大量的工程工作——使得每个 Python 程序员能够以最低的学习成本编写 Taichi 程序。你甚至可以选择你最喜欢的 Python 包管理系统、Python IDE 以及其他 Python 包和 Taichi 一起结合使用。
可移植性
Taichi 既能在 CPU,也能在 GPU 上运行。你只需根据你的硬件平台初始化 Taichi:
# 在 GPU 上运行,自动选择后端
ti.init(arch=ti.gpu)
# 在 GPU 上运行, 使用 NVIDIA CUDA 后端
ti.init(arch=ti.cuda)
# 在 GPU 上运行, 使用 OpenGL 后端
ti.init(arch=ti.opengl)
# 在 GPU 上运行, 使用苹果 Metal 后端(仅对 OS X)有效
ti.init(arch=ti.metal)
# 在 CPU 上运行 (默认)
ti.init(arch=ti.cpu)
注解
不同操作系统所支持的后端:
| 平台 | CPU | CUDA | OpenGL | Metal |
|---|---|---|---|---|
| Windows | 可用 | 可用 | 可用 | 不可用 |
| Linux | 可用 | 可用 | 可用 | 不可用 |
| Mac OS X | 可用 | 不可用 | 不可用 | 可用 |
(可用: 该系统上有最完整的支持;不可用: 由于平台限制,我们无法实现该后端)
在参数 arch=ti.gpu 下,Taichi 将首先尝试在 CUDA 上运行。如果你的设备不支持 CUDA,那么 Taichi 将会转到 Metal 或 OpenGL。如果所在平台不支持 GPU 后端(CUDA、Metal 或 OpenGL),Taichi 将默认在 CPU 运行。
注解
当在 Windows 平台 或者 ARM 设备(如 NVIDIA Jetson)上使用 CUDA 后端时, Taichi 会默认分配 1 GB 显存用于张量存储。如需重载显存分配,你可以在初始化的时候通过 ti.init(arch=ti.cuda, device_memory_GB=3.4) 来分配 3.4 GB 显存,或者使用 ti.init(arch=ti.cuda, device_memory_fraction=0.3) 来分配所有可用显存的 30%.
在其他平台上, Taichi 将会使用它的自适应内存分配器来动态分配内存。
(稀疏)张量
Taichi 是一门面向数据的程序设计语言,其中(稠密、稀疏)张量是第一类公民(First-class Citizen)。在 Sparse computation (WIP) 这一章节,你可以了解到更多关于稀疏张量的详细信息。
在以上代码中,pixels = ti.var(dt=ti.f32, shape=(n * 2, n)) 分配了一个叫做 pixels 的二维张量,大小是 (640, 320) ,数据类型是 ti.f32 (即,C语言中的 float).
函数与内核
计算发生在 Taichi 的 内核(kernel) 中。内核的参数必须显式指定类型。Taichi 内核与函数中所用的语法,看起来和 Python 的很像,然而 Taichi 的前端编译器会将其转换为 编译型,静态类型,有词法作用域,并行执行且可微分 的语言。
Taichi 的 函数 可以被 Taichi 内核和其他 Taichi 函数调用,你应该使用关键字 ti.func 来进行定义。
注解
Taichi 作用域与 Python 作用域:任何被 @ti.kernel 和 @ti.func 修饰的函数体都处于 Taichi 作用域中,这些代码会由 Taichi 编译器编译。而在 Taichi 作用域之外的就都是 Python 作用域了,它们是单纯的 Python 代码。
警告
Taichi 内核只有在 Python 作用域中才能调用,也就是说,我们不支持嵌套内核。同时,虽然不同函数可以嵌套调用,但 Taichi 暂不支持递归函数 。
Taichi 函数只有在 Taichi 作用域中才能调用。
如果用 CUDA 做类比的话, ti.func 就像是 __device__,ti.kernel 就像是 __global__。
并行执行的for循环
最外层作用域的 for 循环是被 自动并行执行 的。Taichi 的 for 循环具有两种形式, 区间 for 循环,和 结构 for 循环。
区间 for 循环 和普通的 Python for 循环没多大区别,只是 Taichi 最外层的 for 会并行执行而已。区间 for 循环可以嵌套。
@ti.kernel
def fill():
for i in range(10): # 并行执行
x[i] += i
s = 0
for j in range(5): # 在每个并行的线程中顺序执行
s += j
y[i] = s
@ti.kernel
def fill_3d():
# 在区间 3 <= i < 8, 1 <= j < 6, 0 <= k < 9 上展开并行
for i, j, k in ti.ndrange((3, 8), (1, 6), 9):
x[i, j, k] = i + j + k
注解
是最外层 作用域 的循环并行执行,而不是最外层的循环。
@ti.kernel
def foo():
for i in range(10): # 并行 :-)
…
@ti.kernel
def bar(k: ti.i32):
if k > 42:
for i in range(10): # 串行 :-(
…
结构 for 循环 在遍历(稀疏)张量元素的时候很有用。例如在上述的代码中,for i, j in pixels 将遍历所有像素点坐标, 即 (0, 0), (0, 1), (0, 2), ... , (0, 319), (1, 0), ..., (639, 319)。
注解
结构 for 循环是 Taichi 稀疏计算(Sparse computation (WIP))的关键,它只会遍历稀疏张量中的活跃元素。对于稠密张量而言,所有元素都是活跃元素。
警告
结构 for 循环只能使用在内核的最外层作用域。
是最外层 作用域 的循环并行执行,而不是最外层的循环。
@ti.kernel
def foo():
for i in x:
…
@ti.kernel
def bar(k: ti.i32):
# 最外层作用域是 `if` 语句
if k > 42:
for i in x: # 语法错误。结构 for 循环 只能用于最外层作用域
…
警告
并行循环不支持 break 语句:
@ti.kernel
def foo():
for i in x:
...
break # 错误:并行执行的循环不能有 break
@ti.kernel
def foo():
for i in x:
for j in y:
...
break # 可以
Interacting with other Python packages
Python-scope data access
Everything outside Taichi-scopes (ti.func and ti.kernel) is simply Python code.
In Python-scopes, you can access Taichi tensor elements using plain indexing syntax.
For example, to access a single pixel of the rendered image in Python-scope, simply use:
import taichi as ti
pixels = ti.var(ti.f32, (1024, 512))
pixels[42, 11] = 0.7 # store data into pixels
print(pixels[42, 11]) # prints 0.7
Sharing data with other packages
Taichi provides helper functions such as from_numpy and to_numpy for transfer data between Taichi tensors and NumPy arrays,
So that you can also use your favorite Python packages (e.g. numpy, pytorch, matplotlib) together with Taichi. e.g.:
import taichi as ti
pixels = ti.var(ti.f32, (1024, 512))
import numpy as np
arr = np.random.rand(1024, 512)
pixels.from_numpy(arr) # load numpy data into taichi tensors
import matplotlib.pyplot as plt
arr = pixels.to_numpy() # store taichi data into numpy arrays
plt.imshow(arr)
plt.show()
import matplotlib.cm as cm
cmap = cm.get_cmap('magma')
gui = ti.GUI('Color map')
while gui.running:
render_pixels()
arr = pixels.to_numpy()
gui.set_image(cmap(arr))
gui.show()
在 Interacting with external arrays 这一章节获得更多有关细节。
语法
内核
内核参数必须有类型提示。内核最多只能有 8 个参数,例如,
@ti.kernel
def print_xy(x: ti.i32, y: ti.f32):
print(x + y)
一个内核可以有一个 标量 返回值。如果内核有一个返回值,那它必须有类型提示。这个返回值会自动转换到所提示的类型。例如,
@ti.kernel
def add_xy(x: ti.f32, y: ti.f32) -> ti.i32:
return x + y # 等价于: ti.cast(x + y, ti.i32)
res = add_xy(2.3, 1.1)
print(res) # 3,因为返回值类型是 ti.i32
注解
目前,我们只支持返回一个标量。返回 ti.Matrix 或者 ti.Vector 是不支持的。Python 方式的返回元组也是不支持的。例如:
@ti.kernel
def bad_kernel() -> ti.Matrix:
return ti.Matrix([[1, 0], [0, 1]]) # 错误
@ti.kernel
def bad_kernel() -> (ti.i32, ti.f32):
x = 1
y = 0.5
return x, y # 错误
在 Taichi 内核中,我们也支持 模板参数(template arguments) (参见 Template metaprogramming) 和 外部数组参数(external array arguments) (参见 Interacting with external arrays)
警告
当使用可微编程时,对内核数据结构有一些约定。参见 Differentiable programming (WIP) 中的 内核简化规则(Kernel Simplicity Rule) 。
请不要在可微编程中使用内核返回值,因为这种返回值并不会被自动微分追踪。取而代之,可以把结果存入全局变量(例如 loss[None])。
函数
使用 @ti.func 来装饰您的 Taichi 函数。这些函数只能在 Taichi 作用域内调用。不要在 Python 作用域内调用它们。
@ti.func
def laplacian(t, i, j):
return inv_dx2 * (
-4 * p[t, i, j] + p[t, i, j - 1] + p[t, i, j + 1] + p[t, i + 1, j] +
p[t, i - 1, j])
@ti.kernel
def fdtd(t: ti.i32):
for i in range(n_grid): # 并行
for j in range(n_grid): # 在每个并行的线程中分别顺序执行
laplacian_p = laplacian(t - 2, i, j)
laplacian_q = laplacian(t - 1, i, j)
p[t, i, j] = 2 * p[t - 1, i, j] + (
c * c * dt * dt + c * alpha * dt) * laplacian_q - p[
t - 2, i, j] - c * alpha * dt * laplacian_p
警告
目前不支持具有多个 return 语句的函数。请用 局部变量 暂存结果,以便最终只有一个 return 语句:
# 错误示范 - 两个返回语句
@ti.func
def safe_sqrt(x):
if x >= 0:
return ti.sqrt(x)
else:
return 0.0
# 正确示范 - 一个返回语句
@ti.func
def safe_sqrt(x):
rst = 0.0
if x >= 0:
rst = ti.sqrt(x)
else:
rst = 0.0
return rst
警告
目前,所有函数都是强制内联的。因此,不能使用递归。
注解
函数的参数是以值传递的。
注解
Unlike functions, kernels do not support vectors or matrices as arguments:
@ti.func
def sdf(u): # functions support matrices and vectors as arguments. No type-hints needed.
return u.norm() - 1
@ti.kernel
def render(d_x: ti.f32, d_y: ti.f32): # kernels do not support vector/matrix arguments yet. We have to use a workaround.
d = ti.Vector([d_x, d_y])
p = ti.Vector([0.0, 0.0])
t = sdf(p)
p += d * t
...
标量算术
Taichi 支持的标量函数:
-
ti.sin(x)
-
ti.cos(x)
-
ti.asin(x)
-
ti.acos(x)
-
ti.atan2(x, y)
-
ti.cast(x, data_type)
-
ti.sqrt(x)
-
ti.rsqrt(x)
-
ti.floor(x)
-
ti.ceil(x)
-
ti.tan(x)
-
ti.tanh(x)
-
ti.exp(x)
-
ti.log(x)
-
ti.random(data_type)
-
abs(x)
-
int(x)
-
float(x)
-
max(x, y)
-
min(x, y)
-
pow(x, y)
注解
Python 3 中 / (浮点数除法)和 // (整数除法)是区分开来的。例如,1.0 / 2.0 = 0.5,1 / 2 = 0.5,1 // 2 = 0,4.2 // 2 = 2。Taichi 也遵循了这个设计:
- true divisions on integral types will first cast their operands to the default float point type.
- floor divisions on float-point types will first cast their operands to the default integer type.
为避免这样的隐式转换,你可以手动使用 ti.cast 将你的操作数转换为你需要的类型。参见 默认精度 获取数字类型的更多细节。
注解
当这些标量函数被作用在 Matrices 或 向量 上时,它们会被逐个作用到所有元素,例如:
B = ti.Matrix([[1.0, 2.0, 3.0], [4.0, 5.0, 6.0]])
C = ti.Matrix([[3.0, 4.0, 5.0], [6.0, 7.0, 8.0]])
A = ti.sin(B)
# is equivalent to
for i in ti.static(range(2)):
for j in ti.static(range(3)):
A[i, j] = ti.sin(B[i, j])
A = ti.pow(B, 2)
# is equivalent to
for i in ti.static(range(2)):
for j in ti.static(range(3)):
A[i, j] = ti.pow(B[i, j], 2)
A = ti.pow(B, C)
# is equivalent to
for i in ti.static(range(2)):
for j in ti.static(range(3)):
A[i, j] = ti.pow(B[i, j], C[i, j])
A += 2
# is equivalent to
for i in ti.static(range(2)):
for j in ti.static(range(3)):
A[i, j] += 2
A += B
# is equivalent to
for i in ti.static(range(2)):
for j in ti.static(range(3)):
A[i, j] += B[i, j]
类型系统
Taichi supports common numerical data types. Each type is denoted as
a character indicating its category and a number of precision bits, e.g., i32 and f64.
The category can be one of:
ifor signed integers, e.g. 233, -666ufor unsigned integers, e.g. 233, 666ffor floating point numbers, e.g. 2.33, 1e-4
The digital number can be one of:
8163264
It represents how many bits are used in storing the data. The larger the bit number, the higher the precision is.
For example, the two most commonly used types:
i32represents a 32-bit signed integer.f32represents a 32-bit floating pointer number.
支持的类型
目前,Taichi支持的基本类型有
- int8
ti.i8 - int16
ti.i16 - int32
ti.i32 - int64
ti.i64 - uint8
ti.u8 - uint16
ti.u16 - uint32
ti.u32 - uint64
ti.u64 - float32
ti.f32 - float64
ti.f64
注解
每种后端支持的类型分别有:
| 类型 | CPU/CUDA | OpenGL | Metal |
|---|---|---|---|
| i8 | OK | N/A | OK |
| i16 | OK | N/A | OK |
| i32 | OK | OK | OK |
| i64 | OK | EXT | N/A |
| u8 | OK | N/A | OK |
| u16 | OK | N/A | OK |
| u32 | OK | N/A | OK |
| u64 | OK | N/A | N/A |
| f32 | OK | OK | OK |
| f64 | OK | OK | N/A |
(OK:已支持,EXT:需要扩展支持,N/A:目前不支持)
注解
Boolean types are represented using ti.i32.
Type promotion
Binary operations on different types will give you a promoted type, following the C programming language convention, e.g.:
i32 + f32 = f32(integer + float = float)i32 + i64 = i64(less-bits + more-bits = more-bits)
Basically it will try to choose the more precise type to contain the result value.
默认精度
By default, all numerical literals have 32-bit precisions.
For example, 42 has type ti.i32 and 3.14 has type ti.f32.
Default integer and float-point precisions (default_ip and default_fp) can be specified when initializing Taichi:
ti.init(default_fp=ti.f32)
ti.init(default_fp=ti.f64)
ti.init(default_ip=ti.i32)
ti.init(default_ip=ti.i64)
Also note that you may use float or int in type definitions as aliases
for default precisions, e.g.:
ti.init(default_ip=ti.i64, default_fp=ti.f32)
x = ti.var(float, 5)
y = ti.var(int, 5)
# is equivalent to:
x = ti.var(ti.f32, 5)
y = ti.var(ti.i64, 5)
def func(a: float) -> int:
...
# is equivalent to:
def func(a: ti.f32) -> ti.i64:
...
类型转换
Implicit casts
警告
The type of a variable is determinated on it’s initialization.
When a low-precision variable is assigned to a high-precision variable, it will be implicitly promoted to the wide type and no warning will be raised:
a = 1.7
a = 1
print(a) # 1.0
When a high-precision variable is assigned to a low-precision type, it will be implicitly down-cast into the low-precision type and Taichi will raise a warning:
a = 1
a = 1.7
print(a) # 1
Explicit casts
You may use ti.cast to explicitly cast scalar values between different types:
a = 1.7
b = ti.cast(a, ti.i32) # 1
c = ti.cast(b, ti.f32) # 1.0
Equivalently, use int() and float() to convert values to float-point or
integer types of default precisions:
a = 1.7
b = int(a) # 1
c = float(a) # 1.0
Casting vectors and matrices
Type casts applied to vectors/matrices are element-wise:
u = ti.Vector([2.3, 4.7])
v = int(u) # ti.Vector([2, 4])
# If you are using ti.i32 as default_ip, this is equivalent to:
v = ti.cast(u, ti.i32) # ti.Vector([2, 4])
Bit casting
使用 ti.bit_cast 将值比特转换为另一种数据类型。 基础位将保留在此转换中。 新类型的宽度必须与旧类型的宽度相同。 例如,不允许将 i32 转换成 f64。 请谨慎使用此操作。
张量与矩阵
在Taichi中,张量是全局变量。张量分为稀疏张量和密集张量。张量的元素可以是标量,也可以是矩阵。
注解
尽管数学上矩阵被视为2D张量,但在Taichi中, 张量 和 矩阵 是两个完全不同的概念。 矩阵可以用作张量元素,因此你可以使每个元素都是矩阵的张量。
由标量组成的张量
每个全局变量都是个N维张量。
- 全局
标量被视为标量的0-D张量。
- 全局
总是使用索引访问张量
- 例如,如果
x是标量3D张量,则x[i, j, k]。 - 即使访问0-D张量
x,也应使用x[None] = 0而不是x = 0。 请 始终 使用索引访问张量中的条目。
- 例如,如果
张量元素全部会被初始化为0。
稀疏张量的元素最初是全部未激活的。
详情请见 Tensors of scalars 。
由矩阵组成的张量
张量元素也可以是矩阵。
假设你有一个名为 A 的 128 x 64 张量,每个元素都包含一个 3 x 2 矩阵。 要分配 3 x 2 矩阵的 128 x 64 张量,请使用声明 A = ti.Matrix(3, 2, dt=ti.f32, shape=(128, 64)) 。
- 如果要获取网格节点
i, j的矩阵,请使用mat = A[i, j]。mat只是一个3 x 2矩阵 - 要获取第1行第2列的矩阵元素,请用:
mat[0, 1]或者A[i, j][0, 1]。 - 你可能已经注意到,当你从全局矩阵张量加载矩阵元素时,会有 两个 索引运算符
[]:第一个用于张量索引,第二个用于矩阵索引。 ti.Vector其实是ti.Matrix的别名。- 有关矩阵的更多信息,请参见 Matrices 。
矩阵大小
由于性能原因,矩阵运算将被展开,因此我们建议仅使用小型矩阵。 例如,2x1, 3x3 , 4x4 矩阵还好,但 32x6 可能太大了。
警告
由于展开机制,在大型矩阵(例如 32x128 )上进行操作会导致很长的编译时间和较低的性能。
如果你的矩阵有个维度很大(比如 64),最好定义一个大小为 64 的张量。比如,声明一个 ti.Matrix(64, 32, dt=ti.f32, shape=(3, 2)) 是不合理的,可以试着用 ti.Matrix(3, 2, dt=ti.f32, shape=(64, 32)) 代替——始终把大的维度放在张量里。
原子操作
在Taichi中,增量赋值(例如,x[i] += 1 )自动即为 原子操作。
警告
并行修改全局变量时,请确保使用原子操作。 例如,合计 x 中的所有元素,
@ti.kernel
def sum():
for i in x:
# 方式 1: 正确
total[None] += x[i]
# 方式 2: 正确
ti.atomic_add(total[None], x[i])
# 方式 3: 非原子操作因而会得到错误结果
total[None] = total[None] + x[i]
注解
当将原子操作应用于局部值时,Taichi编译器将尝试将这些运算降级为它们的非原子对应值。
除了增量赋值(augmented assignment)之外,显式的原子操作(例如 ti.atomic_add )也可以原子地进行读取-修改-写入。 这些操作还会返回第一个参数的 旧值 。
以下是所有显式原子操作的列表:
-
ti.atomic_add(x, y)
-
ti.atomic_sub(x, y)¶ 原子地计算
x + y或x-y并将结果存储在x中。返回: x的旧值。例如,:
x[i] = 3 y[i] = 4 z[i] = ti.atomic_add(x[i], y[i]) # 现在 x[i] = 7, y[i] = 4, z[i] = 3
-
ti.atomic_and(x, y)
-
ti.atomic_or(x, y)
-
ti.atomic_xor(x, y)¶ 原子式计算
x&y(按位和),x | y(按位或),或者x ^ y(按位异或),并将结果存储在x中。返回: x的旧值。
注解
每个后端所支持的原子操作:
| 类型 | CPU/CUDA | OpenGL | Metal |
|---|---|---|---|
i32 |
OK | OK | OK |
f32 |
OK | OK | OK |
i64 |
OK | EXT | N/A |
f64 |
OK | EXT | N/A |
(OK:已支持,EXT:需要扩展支持,N/A:目前不支持)
与外部数组进行交互
External arrays refer to numpy.ndarray or torch.Tensor.
Taichi张量与外部数组之间的转换
使用 to_numpy/from_numpy/to_torch/from_torch:
import taichi as ti
import numpy as np
ti.init()
n = 4
m = 7
# Taichi tensors
val = ti.var(ti.i32, shape=(n, m))
vec = ti.Vector(3, dt=ti.i32, shape=(n, m))
mat = ti.Matrix(3, 4, dt=ti.i32, shape=(n, m))
# Scalar
arr = np.ones(shape=(n, m), dtype=np.int32)
val.from_numpy(arr)
arr = val.to_numpy()
# Vector
arr = np.ones(shape=(n, m, 3), dtype=np.int32)
vec.from_numpy(arr)
arr = np.ones(shape=(n, m, 3, 1), dtype=np.int32)
vec.from_numpy(arr)
arr = vec.to_numpy()
assert arr.shape == (n, m, 3)
arr = vec.to_numpy(keep_dims=True)
assert arr.shape == (n, m, 3, 1)
# Matrix
arr = np.ones(shape=(n, m, 3, 4), dtype=np.int32)
mat.from_numpy(arr)
arr = mat.to_numpy()
assert arr.shape == (n, m, 3, 4)
TODO: add API reference
Using external arrays as Taichi kernel parameters
外部数组参数的类型提示是 ti.ext_arr()。请参阅下面的示例。请注意,结构for循环不支持外部数组。
import taichi as ti
import numpy as np
ti.init()
n = 4
m = 7
val = ti.var(ti.i32, shape=(n, m))
@ti.kernel
def test_numpy(arr: ti.ext_arr()):
for i in range(n):
for j in range(m):
arr[i, j] += i + j
a = np.empty(shape=(n, m), dtype=np.int32)
for i in range(n):
for j in range(m):
a[i, j] = i * j
test_numpy(a)
for i in range(n):
for j in range(m):
assert a[i, j] == i * j + i + j
标量组成的张量
定义
-
ti.var(dt, shape = None, offset = None)¶ 参数: - dt – (数据类型)张量元素的数据类型
- shape – (可选,标量或元组)张量的形状
- offset – (可选,标量或元组)请参见 Coordinate offsets
例如,这将创建一个具有四个
int32作为元素的 稠密(dense) 张量:x = ti.var(ti.i32, shape=4)
这将创建一个元素为
float32类型的4x3 稠密 张量:x = ti.var(ti.f32, shape=(4, 3))
如果 shape 是
()(空元组),则创建一个0-D张量(标量):x = ti.var(ti.f32, shape=())
随后通过传递
None作为索引来访问它:x[None] = 2
如果形状参数 未提供 或指定为
None,则其后用户必须在手动放置 (place) 它:x = ti.var(ti.f32) ti.root.dense(ti.ij, (4, 3)).place(x) # 等价于: x = ti.var(ti.f32, shape=(4, 3))
注解
通过不指定参数 shape 的写法,你可以将张量 放置 为默认的 稠密数据布局 之外的其他布局中,有关更多详细信息,请参见: Advanced dense layouts 。
警告
在任何内核调用或变量访问之前,所有变量都必须被创建和放置完毕。例如:
x = ti.var(ti.f32)
x[None] = 1 # 错误:x没有放置!
x = ti.var(ti.f32, shape=())
@ti.kernel
def func():
x[None] = 1
func()
y = ti.var(ti.f32, shape=())
# 错误:内核调用后不能再创建新的变量!
x = ti.var(ti.f32, shape=())
x[None] = 1
y = ti.var(ti.f32, shape=())
# 错误:任一变量访问过后不能再创建新的变量!
访问分量
您可以通过一个或多个索引来访问 Taichi 张量的元素。
-
a[p, q, ...] 参数: - a – (张量)标量张量
- p – 第一个张量维度的(标量)索引
- q – 第二个张量维度的(标量)索引
返回: (标量)
[p, q, ...]处的元素这将提取张量
a在索引为[3, 4]处的元素值:x = a[3, 4]
这会将一维张量
b在索引2处的元素值设置为5:b[2] = 5
注解
在 Python 中, x[(exp1, exp2, …, expN)] 等效于 x[(exp1, exp2, …, expN)] ; 后者只是前者的语法糖。
注解
如果
a是由Vector/Matrix构成的张量,则返回的值也可以是 Vector / Matrix,有关更多详细信息,请参见: 向量。
元数据
-
a.shape¶ 参数: a – (张量)张量 返回: (元组)张量 a的形状x = ti.var(ti.i32, (6, 5)) x.shape # (6, 5) y = ti.var(ti.i32, 6) y.shape # (6,) z = ti.var(ti.i32, ()) z.shape # ()
-
a.dtype¶ 参数: a – (张量)张量 返回: (数据类型) a的数据类型x = ti.var(ti.i32, (2, 3)) x.dtype # ti.i32
-
a.parent(n = 1)¶ 参数: - a – (张量)张量
- n – (可选,标量)父级步数,即父级节点为
n = 1,祖父级节点为n = 2,等等。
返回: (结构节点)
a所属结构节点的父类节点x = ti.var(ti.i32) y = ti.var(ti.i32) blk1 = ti.root.dense(ti.ij, (6, 5)) blk2 = blk1.dense(ti.ij, (3, 2)) blk1.place(x) blk2.place(y) x.parent() # blk1 y.parent() # blk2 y.parent(2) # blk1
有关更多详细信息,请参见 Structural nodes (SNodes) 。
向量
在Taichi中,向量的表述有两种形式:
- 作为临时局部变量,一个
n分量的向量由标量n组成。- 作为全局张量(global tensor)的构成元素。比如,由向量
n组成的N-维数组构成了的一个全局张量。
In fact, Vector is simply an alias of Matrix, just with m = 1. See Matrices and 张量与矩阵 for more details.
声明向量
全局张量中的向量
-
ti.Vector.var(n, dt, shape = None, offset = None)¶ 参数: - n – (标量) 向量中分量数目
- dt – (数据类型) 向量中分量的数据类型
- shape – (optional, scalar or tuple) shape the tensor of vectors, see 张量与矩阵
- offset – (optional, scalar or tuple) see Coordinate offsets
例如, 这里我们创建了一个5x4的张量,张量中的元素都是3维的向量:
# Python-scope a = ti.Vector.var(3, dt=ti.f32, shape=(5, 4))
注解
在Python-scope中, ti.var 声明 Tensors of scalars, 而 ti.Vector 声明了由向量构成的张量。
访问向量分量
全局张量中的向量
-
a[p, q, ...][i] 参数: - a – (tensor of Vector) the vector
- p – (标量) 张量的行索引
- q – (标量) 张量的列索引
- i – (标量) 向量内分量的索引
这里提取出了向量
a[6, 3]的第一个分量:x = a[6, 3][0] # or vec = a[6, 3] x = vec[0]
注解
Always use two pairs of square brackets to access scalar elements from tensors of vectors.
- 第一组方括号负责定位张量中的向量;
- 第二组方括号负责定位向量中的标量。
特别的,对0维张量第一组方括号应该使用 [None] 。
临时局部变量向量
-
a[i] 参数: - a – (向量)
- i – 指定访问下标
例如,这里我们提取出了向量
a的第一个分量:x = a[0]
同理,将
a的第二个分量设置为 4:a[1] = 4
TODO: add descriptions about
a(i, j)
相关方法
-
a.norm(eps = 0)¶ 参数: - a – (向量)向量
- eps – (可选标量) sqrt的安全保护值,通常为0. 详见下面注解。
返回: (标量) 向量的大小、长度、范数
例如:
a = ti.Vector([3, 4]) a.norm() # sqrt(3*3 + 4*4 + 0) = 5
a.norm(eps)相当于ti.sqrt(a.dot(a) + eps)
注解
可以通过设置 eps = 1e-5 ,对可微分编程中零向量上的梯度值计算进行防护。
-
a.norm_sqr()¶ 参数: a – (向量)向量 返回: (scalar) the square of the magnitude / length / norm of vector 例如:
a = ti.Vector([3, 4]) a.norm_sqr() # 3*3 + 4*4 = 25
a.norm_sqr()is equivalent toa.dot(a)
-
a.normalized()¶ 参数: a – (向量)向量 返回: (Vector) the normalized / unit vector of a例如:
a = ti.Vector([3, 4]) a.normalized() # [3 / 5, 4 / 5]
a.normalized()is equivalent toa / a.norm().
-
a.dot(b)¶ 参数: - a – (向量)向量
- b – (向量)向量
返回: (标量)
a和b之间点乘(内积)的结果例如:
a = ti.Vector([1, 3]) b = ti.Vector([2, 4]) a.dot(b) # 1*2 + 3*4 = 14
-
a.cross(b)¶ 参数: - a – (Vector, 2 or 3 components)
- b – (Vector of the same size as a)
返回: (scalar (for 2D inputs), or 3D Vector (for 3D inputs)) the cross product of
aandbWe use a right-handed coordinate system. E.g.,
a = ti.Vector([1, 2, 3]) b = ti.Vector([4, 5, 6]) c = ti.cross(a, b) # c = [2*6 - 5*3, 4*3 - 1*6, 1*5 - 4*2] = [-3, 6, -3] p = ti.Vector([1, 2]) q = ti.Vector([4, 5]) r = ti.cross(a, b) # r = 1*5 - 4*2 = -3
-
a.outer_product(b)¶ 参数: - a – (向量)向量
- b – (向量)向量
返回: (矩阵)
a和b之间张量积的结果例如:
a = ti.Vector([1, 2]) b = ti.Vector([4, 5, 6]) c = ti.outer_product(a, b) # NOTE: c[i, j] = a[i] * b[j] # c = [[1*4, 1*5, 1*6], [2*4, 2*5, 2*6]]
注解
This have no common with ti.cross. a and b do not have to be 3 or 2 component vectors.
-
a.cast(dt)¶ 参数: - a – (向量)向量
- dt – (DataType)
返回: (向量) 将向量
a中分量的数据类型转化为类型dt例如:
# Taichi-scope a = ti.Vector([1.6, 2.3]) a.cast(ti.i32) # [2, 3]
注解
向量是只有一列的特殊矩阵。实际上,ti.Vector 只是 ti.Matrix 的别名。
矩阵
ti.Matrix只适用于小矩阵(如3x3)。如果要使用 64x64 的矩阵,你可以用标量构成的二维张量。ti.Vector和ti.Matrix相同,只不过它只有一列。- 注意区分逐元素的乘法
*和矩阵乘法@。 ti.Vector(n, dt=ti.f32)或ti.Matrix(n, m, dt=ti.f32)用来创建向量/矩阵构成的张量。A.transpose()R, S = ti.polar_decompose(A, ti.f32)U, sigma, V = ti.svd(A, ti.f32)(其中sigma是一个3x3矩阵)- ``any(A)``(仅 Taichi 作用域)
- ``all(A)``(仅 Taichi 作用域)
TODO: doc here better like Vector. WIP
Taichi中的矩阵有两种形式:
- 作为临时局部变量。一个由
n*m个标量构成的n×m阶矩阵。- 作为全局张量的一个成员。在这种情况下, 张量是一个由
n×m阶矩阵构成的N-维的数组。
定义
作为全局张量的矩阵
-
ti.Matrix.var(n, m, dt, shape = None, offset = None)¶ 参数: - n – (标量)矩阵的行数
- m – (标量)矩阵的列数
- dt – (数据类型)元素的数据类型
- shape – (可选,标量或元组)向量张量的形状,见 张量与矩阵
- offset – (可选,标量或元组)请参见 Coordinate offsets
例如, 以下创建了一个由 3x3 矩阵构成的 5x4 的张量:
# Python-scope a = ti.Matrix.var(3, 3, dt=ti.f32, shape=(5, 4))
注解
在 Python-scope 中, ti.var 声明了 Tensors of scalars , ti.Matrix 声明了由矩阵组成的张量。
作为一个临时的本地变量
-
ti.Matrix([[x, y, ...][, z, w, ...], ...])¶ 参数: - x – (标量)第一行第一个元素
- y – (标量)第一行第二个元素
- z – (标量)第二行第一个元素
- w – (标量)第二行第二个元素
例如,下述将创建一个 2x3 的矩阵,第一行中的分量为 (2, 3, 4) ,第二行的为 (5, 6, 7) 中:
# Taichi-scope a = ti.Matrix([[2, 3, 4], [5, 6, 7]])
-
ti.Matrix.rows([v0, v1, v2, ...])
-
ti.Matrix.cols([v0, v1, v2, ...])¶ 参数: - v0 – (向量)组成第一行(列)元素的向量
- v1 – (向量)组成第二行(列)元素的向量
- v2 – (向量)组成第三行(列)元素的向量
例如,以下代码创建了一个 3x3 矩阵,矩阵的行(列)是由向量拼接构成的:
# Taichi 作用域 v0 = ti.Vector([1.0, 2.0, 3.0]) v1 = ti.Vector([4.0, 5.0, 6.0]) v2 = ti.Vector([7.0, 8.0, 9.0]) # 指定行中的数据 a = ti.Matrix.rows([v0, v1, v2]) # 指定列中的数据 a = ti.Matrix.cols([v0, v1, v2]) # 可以用列表代替参数中的向量 a = ti.Matrix.rows([[1.0, 2.0, 3.0], [4.0, 5.0, 6.0], [7.0, 8.0, 9.0]])
元素访问
作为全局的由向量构成的张量
-
a[p, q, ...][i, j] 参数: - a – (矩阵构成的张量)张量名
- p – (标量)张量的第一维的索引
- q – (标量)张量的第二维的索引
- i – (标量)矩阵的行索引
- j – (标量)矩阵的列索引
以下代码用以访问矩阵
a[6,3]的第一个元素:x = a[6, 3][0, 0] # 或者 mat = a[6, 3] x = mat[0, 0]
注解
访问矩阵形式张量中的标量元素时, 必须 使用两对方括号。
- 第一对方括号中的索引定位张量中的矩阵;
- 第二对方括号中的索引定位矩阵中的标量元素。
对于0维的矩阵形式的张量,第一对方括号中的索引应该为 [None] 。
作为一个临时的本地变量
-
a[i, j] 参数: - a – (矩阵)该矩阵本身
- i – (标量)矩阵的行索引
- j – (标量)矩阵的列索引
比如,访问矩阵
a第0行第1列的元素:x = a[0, 1]
将
a第1行第3列的元素设置为4:a[1, 3] = 4
方法
-
a.transpose()¶ 参数: a – (矩阵)该矩阵本身 返回: (矩阵) a的转置矩阵 。例如:
a = ti.Matrix([[2, 3], [4, 5]]) b = a.transpose() # 现在 b = ti.Matrix([[2, 4], [3, 5]])
注解
a.transpose()不会影响a中的数据,它只是返回结果。
-
a.trace()¶ 参数: a – (矩阵)该矩阵本身 返回: (标量) a矩阵的迹。返回值可以计算为
a[0, 0] + a[1, 1] + ...。
-
a.determinant()¶ 参数: a – (矩阵)该矩阵本身 返回: (标量) a矩阵的行列式。注解
目前用于此函数的矩阵大小必须为 1x1、2x2、3x3 或 4x4。
此函数目前仅在 Taichi 作用域内有效。
-
a.inverse()¶ 参数: a – (矩阵)该矩阵本身 返回: (矩阵) a的逆矩阵。注解
目前用于此函数的矩阵大小必须为 1x1、2x2、3x3 或 4x4。
此函数目前仅在 Taichi 作用域内有效。
结构节点 (SNodes)
在编写计算部分的代码之后,用户需要设定内部层次数据结构。包括微观和宏观两部分,宏观上设定层级数据结构组件之间的嵌套关系以及表示稀疏性的方式;微观上,描述数据如何分组(例如,SOA 或 AOS)。Taichi 提供了 结构节点 (SNodes) 以满足不同层级数据结构构建时的需求。其结构和语义具体如下所示:
- 稠密集合(dense):固定长度的连续数组。
- 位掩码集合(bitmasked):类似于稠密集合,但实现了通过掩码保持数据的稀疏信息。比如为稠密集合的元素分配掩码来记录稀疏信息。
- 指针集合(pointer):存储指针而不是整个结构,以节省内存和保持稀疏性。
- 动态集合(dynamic):可变长度数组,具有预定义的最大长度。它扮演着 C++ 中的
std::vector或者是 Python 中的list这样的角色,可以用来维护包含在一个块(block)中的对象(例如粒子)。
你可以在 Advanced dense layouts 章节中了解更多详细信息。 ti.root 是层级数据结构的根结点.
-
snode.place(x, ...)¶ 参数: - snode – (结构节点) 放置(place)操作的目标
- x – (张量) 要放置的张量对象
返回: (结构节点)
snode对象以下示例代码放置了
x和y两个零维张量:x = ti.var(dt=ti.i32) y = ti.var(dt=ti.f32) ti.root.place(x, y) assert x.snode() == y.snode()
-
tensor.shape()¶ 参数: tensor – (张量) 返回: (整数元组) 张量的形状 Equivalent to
tensor.snode().shape.例如,
ti.root.dense(ti.ijk, (3, 5, 4)).place(x) x.shape # returns (3, 5, 4)
-
tensor.snode()¶ 参数: tensor – (张量) 返回: (SNode) the structual node where tensoris placedx = ti.var(dt=ti.i32) y = ti.var(dt=ti.f32) ti.root.place(x, y) x.snode()
-
snode.shape()¶ 参数: snode – (结构节点) 返回: (tuple) the size of node along that axis blk1 = ti.root blk2 = blk1.dense(ti.i, 3) blk3 = blk2.dense(ti.jk, (5, 2)) blk4 = blk3.dense(ti.k, 2) blk1.shape # () blk2.shape # (3, ) blk3.shape # (3, 5, 2) blk4.shape # (3, 5, 4)
-
snode.parent(n = 1)¶ 参数: - snode – (结构节点)
- n – (optional, scalar) the number of steps, i.e.
n=1for parent,n=2grandparent, etc.
返回: (结构节点)
snode的父节点blk1 = ti.root.dense(ti.i, 8) blk2 = blk1.dense(ti.j, 4) blk3 = blk2.bitmasked(ti.k, 6) blk1.parent() # ti.root blk2.parent() # blk1 blk3.parent() # blk2 blk3.parent(1) # blk2 blk3.parent(2) # blk1 blk3.parent(3) # ti.root blk3.parent(4) # None
不同类型的节点
-
snode.dense(indices, shape)¶ 参数: - snode – (结构节点) 父节点,返回的子节点就是从该节点派生
- indices – (索引)用于子节点上的索引
- shape – (标量或元组)指定向量张量(tensor of vector)的形状
返回: (结构节点)派生出来的子节点
以下示例代码放置了尺寸为
3的一维张量:x = ti.var(dt=ti.i32) ti.root.dense(ti.i, 3).place(x)
以下示例代码放置了尺寸为
(3,4)的二维张量:x = ti.var(dt=ti.i32) ti.root.dense(ti.ij, (3, 4)).place(x)
注解
如果给定的
shape是一个标量,却又对应了多个索引,那么shape将自动扩充直至和索引数量相等。例如,snode.dense(ti.ijk, 3)
相当于
snode.dense(ti.ijk, (3, 3, 3))
-
snode.dynamic(index, size, chunk_size = None)¶ 参数: - snode – (结构节点) 父节点,返回的子节点就是从该节点派生
- index – (索引) 动态集合节点(dynamic node)的索引
- size – (标量)描述该动态集合节点的最大尺寸
- chunk_size – (可选标量)描述动态内存分配时块(chunk)中存储的元素数目
返回: (结构节点)派生出来的子节点
动态集合节点就像 C++ 中的std::vector或者是 Python 中的list。Taichi 具有的动态内存分配系统可以实现自由的分配内存。以下示例代码放置了最大尺寸为
16的一维动态张量:ti.root.dynamic(ti.i, 16).place(x)
-
snode.bitmasked()
-
snode.pointer()
-
snode.hash()¶ TODO: add descriptions here
动态集合节点的使用
-
ti.length(snode, indices)¶ 参数: - snode – (动态集合节点)
- indices – (标量或元组中标量)
动态集合节点的索引
返回: (int32) the current size of the dynamic node
-
ti.append(snode, indices, val)¶ 参数: - snode – (动态集合节点)
- indices – (标量或元组中标量)
动态集合节点的索引 - val – (取决于结构节点的数据类型)想要储存的值
返回: (int32) the size of the dynamic node, before appending
使用上述函数,就能实现通过
索引(indices)将常量(val)插入到动态集合节点中。
Taichi 的张量尺寸
对于张量,非整二次幂的那些维度会被扩充为整二次幂,因而会占据更多虚拟地址空间。例如,一个 (18, 65) 的稠密张量在实际存储时相当于一个 (32, 128) 大小的张量。
元编程
Taichi为元编程提供了基础架构。元编程可以
- 统一对维度依赖的代码开发,例如2维/3维(2D/3D)物理仿真
- 通过将运行时开销转移到编译时来提高运行时的性能
- 简化Taichi标准库的开发
Taichi内核是 惰性实例化 的,并且很多有计算可以发生在 编译时。即使没有模板参数,Taichi中的每一个内核也都是模板内核。
Template metaprogramming
You may use ti.template()
as a type hint to pass a tensor as an argument. For example:
@ti.kernel
def copy(x: ti.template(), y: ti.template()):
for i in x:
y[i] = x[i]
a = ti.var(ti.f32, 4)
b = ti.var(ti.f32, 4)
c = ti.var(ti.f32, 12)
d = ti.var(ti.f32, 12)
copy(a, b)
copy(c, d)
As shown in the example above, template programming may enable us to reuse our code and provide more flexibility.
使用组合索引(grouped indices)的对维度不依赖的编程
However, the copy template shown above is not perfect. For example, it can only be
used to copy 1D tensors. What if we want to copy 2D tensors? Do we have to write
another kernel?
@ti.kernel
def copy2d(x: ti.template(), y: ti.template()):
for i, j in x:
y[i, j] = x[i, j]
Not necessary! Taichi provides ti.grouped syntax which enables you to pack
loop indices into a grouped vector to unify kernels of different dimensionalities.
For example:
@ti.kernel
def copy(x: ti.template(), y: ti.template()):
for I in ti.grouped(y):
# I is a vector with same dimensionality with x and data type i32
# If y is 0D, then I = ti.Vector([]), which is equivalent to `None` when used in x[I]
# If y is 1D, then I = ti.Vector([i])
# If y is 2D, then I = ti.Vector([i, j])
# If y is 3D, then I = ti.Vector([i, j, k])
# ...
x[I] = y[I]
@ti.kernel
def array_op(x: ti.template(), y: ti.template()):
# if tensor x is 2D:
for I in ti.grouped(x): # I is simply a 2D vector with data type i32
y[I + ti.Vector([0, 1])] = I[0] + I[1]
# then it is equivalent to:
for i, j in x:
y[i, j + 1] = i + j
Tensor metadata
Sometimes it is useful to get the data type (tensor.dtype) and shape (tensor.shape) of tensors.
These attributes can be accessed in both Taichi- and Python-scopes.
@ti.func
def print_tensor_info(x: ti.template()):
print('Tensor dimensionality is', len(x.shape))
for i in ti.static(range(len(x.shape))):
print('Size alone dimension', i, 'is', x.shape[i])
ti.static_print('Tensor data type is', x.dtype)
See Tensors of scalars for more details.
注解
对稀疏张量而言,此处会返回其完整域的形状(full domain shape)。
Matrix & vector metadata
Getting the number of matrix columns and rows will allow you to write dimensionality-independent code. For example, this can be used to unify 2D and 3D physical simulators.
matrix.m equals to the number of columns of a matrix, while matrix.n equals to
the number of rows of a matrix.
Since vectors are considered as matrices with one column, vector.n is simply
the dimensionality of the vector.
@ti.kernel
def foo():
matrix = ti.Matrix([[1, 2], [3, 4], [5, 6]])
print(matrix.n) # 2
print(matrix.m) # 3
vector = ti.Vector([7, 8, 9])
print(vector.n) # 3
print(vector.m) # 1
编译时求值(Compile-time evaluations)
Using compile-time evaluation will allow certain computations to happen when kernels are being instantiated. This saves the overhead of those computations at runtime.
- Use
ti.staticfor compile-time branching (for those who come from C++17, this is if constexpr.):
enable_projection = True
@ti.kernel
def static():
if ti.static(enable_projection): # 没有运行时开销
x[0] = 1
- Use
ti.staticfor forced loop unrolling:
@ti.kernel
def func():
for i in ti.static(range(4)):
print(i)
# is equivalent to:
print(0)
print(1)
print(2)
print(3)
何时使用 ti.static 来进行for循环
下面有一些为何应该在for循环的同时使用 ti.static 的原因。
- 循环展开以提高性能。
- 对向量/矩阵的元素进行循环。矩阵的索引必须为编译时常量。张量的索引可以为运行时变量。例如,如果
x是由3维向量组成的1维张量,并可以x[tensor_index][matrix_index]的形式访问。第一个索引(tensor_index)可以是变量,但是第二个索引(matrix_index)必须是一个常量。
例如,向量张量(tensor of vectors)的重置代码应该为
@ti.kernel
def reset():
for i in x:
for j in ti.static(range(x.n)):
# The inner loop must be unrolled since j is a vector index instead
# of a global tensor index.
x[i][j] = 0
高级数据布局
张量(Tensors of scalars)可以 放置(place) 在特定的形状和 布局(layout) 中。构造适当的数据布局对性能来说非常关键,特别是对内存密集型的应用程序而言。精心设计的数据布局可以显著提高缓存/ 旁路转换缓冲(TLB)命中率和缓存行(CacheLine)利用率。不过某些情况下性能不是最优先要考虑的因素,因此你可能不需要去担心它。
在 Taichi 中,布局是以递归的方式定义。请参阅 Structural nodes (SNodes) 获得更多关于其工作方式的细节。我们建议从默认的布局规范开始(通过在 ti.var/Vector/Matrix 中指定 shape 来创建张量),如果需要的话,之后可以再使用 ti.root.X 语法迁移到更高级的布局。
Taichi 将算法与数据布局解耦,并且 Taichi 编译器可以自动优化特定数据布局上的数据访问。这些 Taichi 特性使得程序员可以快速尝试不同的数据布局,并找出针对特定任务和计算机体系结构的最有效布局。
由 shape 到 ti.root.X
例如,这里声明了一个零维张量:
x = ti.var(ti.f32)
ti.root.place(x)
# 相当于:
x = ti.var(ti.f32, shape=())
这里声明了一个尺寸为 3 的一维张量:
x = ti.var(ti.f32)
ti.root.dense(ti.i, 3).place(x)
# 相当于:
x = ti.var(ti.f32, shape=3)
这里声明了一个尺寸为 (3, 4) 的二维张量:
x = ti.var(ti.f32)
ti.root.dense(ti.ij, (3, 4)).place(x)
# 相当于:
x = ti.var(ti.f32, shape=(3, 4))
你可能会有些疑问,单纯的指定张量的 尺寸(shape) 不就行了? 为什么还要使用更为复杂的放置方式? 这是个相当好的问题,接着读下去让我们一起找出原因。
行优先 vs 列优先
让我们先从最简单的布局开始。
由于地址空间在现代计算机结构中是线性排列的,所以对于 Taichi 中的一维张量,第 i 个元素的地址就是简单的处于第 i 号位置上.
为了存储一个多维张量,必须将它扁平化(flatten),以适应一维地址空间。例如,要存储一个大小为 (3, 2) 的二维张量,有两种方法:
- 第
(i, j)位置的地址是起始位置 + i * 2 + j(行优先)。- 第
(i, j)位置的地址是起始位置 + j * 3 + i(列优先)。
下面是在 Taichi 中指定使用以上哪种布局的方式:
ti.root.dense(ti.i, 3).dense(ti.j, 2).place(x) # 默认行优先
ti.root.dense(ti.j, 2).dense(ti.i, 3).place(y) # 列优先
x 和 y 的形状都是 (3, 2) ,访问它们的下标都满足 0 <= i < 3 && 0 <= j < 2 的约束。当然也可以通过相同的下标访问它们: x[i, j] 和 y[i, j] 。不过它们有着非常不同的内存布局:
# 存储地址低 ——————————————————————> 存储地址高
# x: x[0,0] x[0,1] x[0,2] | x[1,0] x[1,1] x[1,2]
# y: y[0,0] y[1,0] | y[0,1] y[1,1] | y[0,2] y[1,2]
由此可见, x 的存储地址首先根据第一个索引下标(即行优先)增加,而 y 首先根据第二个索引下标(即列优先)增加。
注解
对于熟悉 C/C++ 的人来说,这可能看起来像是:
int x[3][2]; // 行优先
int y[2][3]; // 列优先
for (int i = 0; i < 3; i++) {
for (int j = 0; j < 2; j++) {
do_something ( x[i][j] );
do_something ( y[j][i] );
}
}
数组结构体(AoS),结构体数组(SoA)
同样大小的张量可以被放置到一起。
例如,这里在尺寸为3的一层中放置了两个一维张量(数组结构体,AoS):
ti.root.dense(ti.i, 3).place(x, y)
他们的内存布局:
# 存储地址低 ————————————————————> 存储地址高
# x[0] y[0] | x[1] y[1] | x[2] y[2]
相反的,下列两个张量则被分开放置(结构体数组,SoA):
ti.root.dense(ti.i, 3).place(x)
ti.root.dense(ti.i, 3).place(y)
与之对应,它们的内存布局是:
# 存储地址低 ————————————————————> 存储地址高
# x[0] x[1] x[2] | y[0] y[1] y[2]
通常情况下,您不必担心不同布局之间的性能差别,可以从定义最简单的布局开始。然而,局部性(locality)有时会对性能产生重大影响,尤其是当张量很大的时。
为了改善内存访问的空间局部性(即缓存命中率/ 缓存行利用率),有时将数据元素放置在相对较近的存储位置(如果它们经常一起被访问的话)会很有帮助。 以一个简单的一维波动方程的求解为例:
N = 200000
pos = ti.var(ti.f32)
vel = ti.var(ti.f32)
ti.root.dense(ti.i, N).place(pos)
ti.root.dense(ti.i, N).place(vel)
@ti.kernel
def step():
pos[i] += vel[i] * dt
vel[i] += -k * pos[i] * dt
这里,我们将 pos 和 vel 分开放置。由此 pos[i] 和 vel[i] 之间地址空间的距离是 200000 。这将导致糟糕的空间局部性和大量的缓存缺失(Cache-Misses),会在很大程度上降低性能。一个更好的放置方案是把它们放置在一起:
ti.root.dense(ti.i, N).place(pos, vel)
将 vel[i] 放在 pos[i] 旁边,这样就可以提高缓存命中率,从而提高性能。
平面布局 vs 层次布局
默认情况下,当分配一个 ti.var 时,它遵循的是最简单的数据布局。
val = ti.var(ti.f32, shape=(32, 64, 128))
# 相当于 C++ 中的: float val[32][64][128]
但是,对于计算机图形任务而言,有些时候这种数据布局不是最理想的。 例如,val [i, j, k] 和 val [i + 1, j, k] 彼此之间的距离非常远 (32 KB),这导致对于某些计算任务会有着低效的地址访问。 具体而言,在诸如纹理的三线性插值之类任务中,这两个元素甚至不在同一 4KB 的页面内,这将产生巨大的缓存/转址旁路缓存压力。
此时更好的布局可能是
val = ti.var(ti.f32)
ti.root.dense(ti.ijk, (8, 16, 32)).dense(ti.ijk, (4, 4, 4)).place(val)
这会在 4x4x4 模块中放置 val ,因此很有可能有 val [i, j, k] 及其邻居在存储上彼此靠近(即,在同一高速缓存行或内存页中) )。
对高级稠密数据布局进行结构 for 循环
在嵌套稠密数据结构上的结构 for 循环将会自动地遵循它们在内存中的数据顺序。例如,如果二维标量张量 A 是以行为主的顺序存储的,
for i, j in A:
A[i, j] += 1
将按照行优先的顺序对 A 中的元素进行遍历。 如果 A 是列优先的,则按照列优先进行遍历。
如果 A 是分层的,则迭代将在层级之间发生。 在大多数情况下,这可以最大化内存带宽利用率。
稀疏张量的结构 for 循环遵循相同的原理,这将在 Sparse computation (WIP) 中进一步讨论。
示例
二维矩阵,行优先
A = ti.var(ti.f32)
ti.root.dense(ti.ij, (256, 256)).place(A)
二维矩阵,列优先
A = ti.var(ti.f32)
ti.root.dense(ti.ji, (256, 256)).place(A) # 注意是 ti.ji 而不是ti.ij
按 8x8 的大小将 1024x1024 的二维数组分块
density = ti.var(ti.f32)
ti.root.dense(ti.ij, (128, 128)).dense(ti.ij, (8, 8)).place(density)
三维粒子位置和速度,数组结构体(AoS)
pos = ti.Vector(3, dt=ti.f32)
vel = ti.Vector(3, dt=ti.f32)
ti.root.dense(ti.i, 1024).place(pos, vel)
# 相当于
ti.root.dense(ti.i, 1024).place(pos(0), pos(1), pos(2), vel(0), vel(1), vel(2))
三维粒子位置和速度,结构体数组(SoA)
pos = ti.Vector(3, dt=ti.f32)
vel = ti.Vector(3, dt=ti.f32)
for i in range(3):
ti.root.dense(ti.i, 1024).place(pos(i))
for i in range(3):
ti.root.dense(ti.i, 1024).place(vel(i))
Sparse computation (WIP)
警告
The Taichi compiler backend is under migration from source-to-source compilation to LLVM for compilation speed and portability. Sparse computation with the new LLVM backend is not yet fully implemented on multithreaded CPUs and GPUs.
If you are interested in sparse computation in Taichi, please read our paper, watch the introduction video, or check out the SIGGRAPH Asia 2019 slides.
The legacy source-to-source backend (commit dc162e11) provides full sparse computation functionality. However, since little engineering has been done to make that commit portable (i.e. easy to compile on different platforms),
we suggest waiting until the LLVM version of sparse computation is fully implemented.
Sparse computation functionalities with the new LLVM backend will be back online by the end of December 2019.
坐标偏移
- Taichi 张量支持 坐标偏移(coordinate offsets) 的定义方式。偏移量会移动张量的边界,使得张量的原点不再是零向量。一个典型的例子是在物理模拟中支持负坐标的体素。
- 例如,一个大小为
32x64、起始元素坐标偏移为(-16, 8)的矩阵可以按照以下形式来定义:
a = ti.Matrix(2, 2, dt=ti.f32, shape=(32, 64), offset=(-16, 8))
通过这样,张量的下标就是从 (-16, 8) 到 (16, 72) 了(半开半闭区间).
a[-16, 32] # 左下角
a[16, 32] # 右下角
a[-16, 64] # 左上角
a[16, 64] # 右上角
注解
The dimensionality of tensor shapes should be consistent with that of the offset. Otherwise, a AssertionError will be raised.
a = ti.Matrix(2, 3, dt=ti.f32, shape=(32,), offset=(-16, )) # 有效!
b = ti.Vector(3, dt=ti.f32, shape=(16, 32, 64), offset=(7, 3, -4)) # 有效!
c = ti.Matrix(2, 1, dt=ti.f32, shape=None, offset=(32,)) # 断言错误
d = ti.Matrix(3, 2, dt=ti.f32, shape=(32, 32), offset=(-16, )) # 断言错误
e = ti.var(dt=ti.i32, shape=16, offset=-16) # 有效!
f = ti.var(dt=ti.i32, shape=None, offset=-16) # 断言错误
g = ti.var(dt=ti.i32, shape=(16, 32), offset=-16) # 断言错误
Differentiable programming (WIP)
This page is work in progress. Please check out the DiffTaichi paper and video to learn more about Taichi differentiable programming.
DiffTaichi仓库 包含10个使用Taichi可微分编程构建的可微编程物理模拟器。
注解
与TensorFlow等生成 不可变 输出缓冲区的工具不同,Taichi采用的 命令式 编程范式允许程序员自由修改全局张量(多维数组):
全局数据访问规则:
- 如果全局张量元素被多次写入,则从第二次写入开始,写入 必须 以原子加法的形式出现(
累加,使用ti.atomic_add或直接使用+ =)。- 在完成全局张量元素的累加之前,不会对全局张量元素进行读取访问。
内核(Kernel)简化规则: 内核主体由多个 简单嵌套 的for循环组成。 即,每个for循环可以只包含一个(嵌套的)for循环(不包含其他语句),也可以包含一组没有循环的语句。
例子:
@ti.kernel
def differentiable_task():
for i in x:
x[i] = y[i]
for i in range(10):
for j in range(20):
for k in range(300):
... do whatever you want, as long as there are no loops
# Not allowed. The outer for loop contains two for loops
for i in range(10):
for j in range(20):
...
for j in range(20):
...
违反此规则的Taichi程序将在执行梯度运算时产生未定义的行为。
注解
静态for循环 (例如 for i in ti.static(range(4)) )将被Python前端预处理器展开,并且不算作循环级别。
使用微分模拟器和蛮力梯度下降对神经网络控制器进行优化的一些示例:


注解
Apart from differentiating the simulation time steps, you can also automatically differentiate (negative) potential energies to get forces. Here is an example.
文档制作中。
面向数据对象式编程
Taichi是一种 面向数据的 编程(DOP)语言。 但是,单纯的DOP会使模块化变得困难。
为了允许代码模块化,Taichi从面向对象编程(OOP)中借鉴了一些概念。
为了方便起见,我们将称此混合方案为 面向数据对象式编程 (ODOP)。
待办事项:此处应有更多文档。
一个简单的例子:
import taichi as ti
ti.init()
@ti.data_oriented
class Array2D:
def __init__(self, n, m, increment):
self.n = n
self.m = m
self.val = ti.var(ti.f32)
self.total = ti.var(ti.f32)
self.increment = increment
ti.root.dense(ti.ij, (self.n, self.m)).place(self.val)
ti.root.place(self.total)
@staticmethod
@ti.func
def clamp(x): # Clamp to [0, 1)
return max(0, min(1 - 1e-6, x))
@ti.kernel
def inc(self):
for i, j in self.val:
ti.atomic_add(self.val[i, j], self.increment)
@ti.kernel
def inc2(self, increment: ti.i32):
for i, j in self.val:
ti.atomic_add(self.val[i, j], increment)
@ti.kernel
def reduce(self):
for i, j in self.val:
ti.atomic_add(self.total, self.val[i, j] * 4)
arr = Array2D(128, 128, 3)
double_total = ti.var(ti.f32, shape=())
ti.root.lazy_grad()
arr.inc()
arr.inc.grad()
assert arr.val[3, 4] == 3
arr.inc2(4)
assert arr.val[3, 4] == 7
with ti.Tape(loss=arr.total):
arr.reduce()
for i in range(arr.n):
for j in range(arr.m):
assert arr.val.grad[i, j] == 4
@ti.kernel
def double():
double_total[None] = 2 * arr.total
with ti.Tape(loss=double_total):
arr.reduce()
double()
for i in range(arr.n):
for j in range(arr.m):
assert arr.val.grad[i, j] == 8
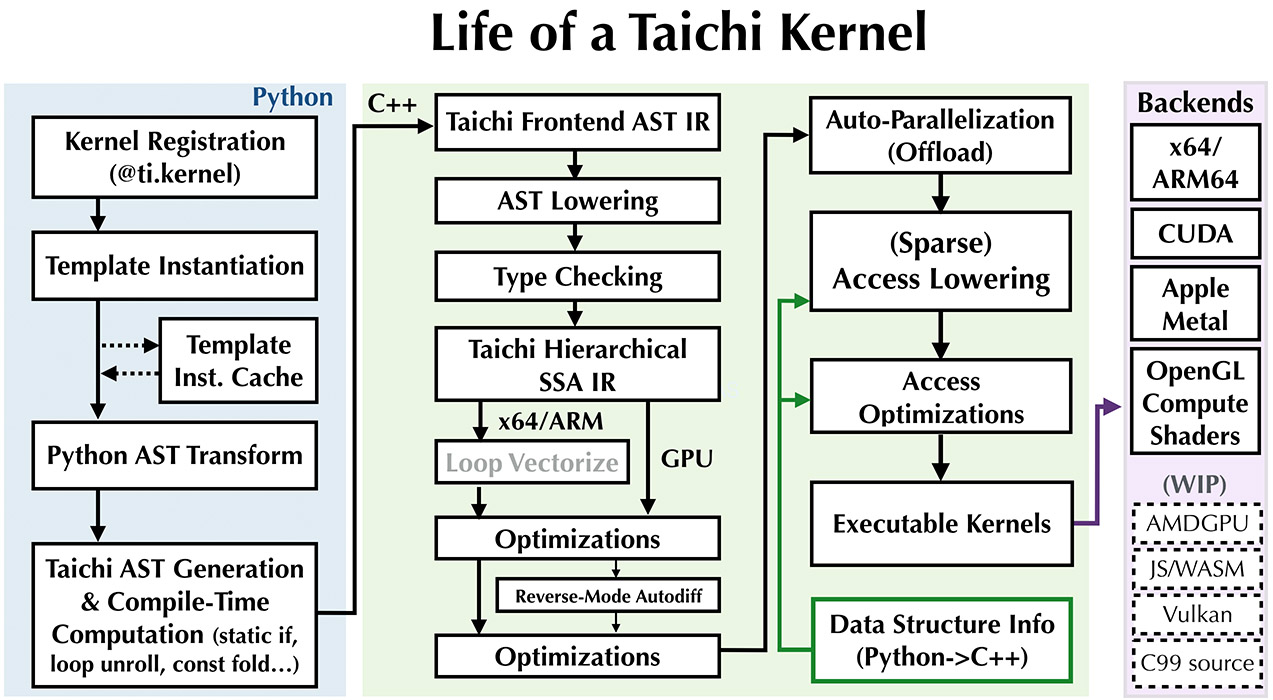
Life of a Taichi kernel
有时了解Taichi内核的生命周期会有所帮助。 简而言之,编译只会在第一次调用内核实例时发生。
The life cycle of a Taichi kernel has the following stages:
- 内核注册
- 模板实例化和缓存
- Python 抽象语法树转换 (AST: Abstact Syntax Tree )
- Taichi IR compilation, optimization, and executable generation
- 启动
让我们考虑以下简单内核:
@ti.kernel
def add(tensor: ti.template(), delta: ti.i32):
for i in tensor:
tensor[i] += delta
We allocate two 1D tensors to simplify discussion:
x = ti.var(dt=ti.f32, shape=128)
y = ti.var(dt=ti.f32, shape=16)
内核注册
当执行 ti.kernel 装饰器时,将注册一个名为 add 的内核。 具体来说,将记住 add 函数的Python抽象语法树(AST)。 在第一次调用 add 之前不会进行编译。
模板实例化和缓存
add(x, 42)
第一次调用 add 时,Taichi前端编译器将实例化内核。
When you have a second call with the same template signature (explained later), e.g.,
add(x, 1)
Taichi将直接重复使用之前编译的二进制文件。
用 ti.template() 提示的参数是模板参数,将引起模板实例化。 例如,
add(y, 42)
将导致 add 的新实例化。
注解
Template signatures are what distinguish different instantiations of a kernel template.
The signature of add(x, 42) is (x, ti.i32), which is the same as that of add(x, 1). Therefore, the latter can reuse the previously compiled binary.
The signature of add(y, 42) is (y, ti.i32), a different value from the previous signature, hence a new kernel will be instantiated and compiled.
注解
Many basic operations in the Taichi standard library are implemented using Taichi kernels using metaprogramming tricks. Invoking them will incur implicit kernel instantiations.
示例包括 x.to_numpy() 和 y.from_torch(torch_tensor)。 调用这些方程时,你将看到内核实例化,因为将生成Taichi内核来把繁重的工作分流给多个CPU内核/ GPU。
如前所述,第二次调用相同的操作时,缓存的已编译内核将被重用,并且不需要进一步的编译。
代码转换和优化
When a new instantiation happens, the Taichi frontend compiler (i.e., the ASTTransformer Python class) will transform the kernel body AST
into a Python script, which, when executed, emits a Taichi frontend AST.
Basically, some patches are applied to the Python AST so that the Taichi frontend can recognize it.
AST 的降阶过程 (lowering pass) 会将前端中间表示代码转换为分层静态单任务 (SSA: Static Single Assignment ) 的中间表示代码,从而可以用更多的过程进一步处理中间表示代码,例如
- 循环矢量化
- 类型推断和检查
- 一般简化,例如通用子表达式消除(CSE),无效指令消除(DIE),常数折叠和存储转发
- 降低访问权限
- 数据访问优化
- 反向模式自动微分(如果使用微分编程)
- 并行化和卸载
- 原子操作降级
即时(JIT)编译引擎
Finally, the optimized SSA IR is fed into backend compilers such as LLVM or Apple Metal/OpenGL shader compilers. The backend compilers then generate high-performance executable CPU/GPU programs.
内核启动
Taichi kernels will be ultimately launched as multi-threaded CPU tasks or GPU kernels.
语法糖
别名
Creating aliases for global variables and functions with cumbersome names can sometimes improve readability. In Taichi, this can be done by assigning kernel and function local variables with ti.static(), which forces Taichi to use standard python pointer assignment.
例如,考虑下面这个简单的内核:
@ti.kernel
def my_kernel():
for i, j in tensor_a:
tensor_b[i, j] = some_function(tensor_a[i, j])
张量和函数使用 ti.static 别名为新名称:
@ti.kernel
def my_kernel():
a, b, fun = ti.static(tensor_a, tensor_b, some_function)
for i,j in a:
b[i,j] = fun(a[i,j])
还可以为类成员和方法创建别名,这有助于防止含有 self 的面向对象编程代码混乱。
例如,考虑使用类内核来计算某个张量的二维拉普拉斯算子:
@ti.kernel
def compute_laplacian(self):
for i, j in a:
self.b[i, j] = (self.a[i + 1,j] - 2.0*self.a[i, j] + self.a[i-1, j])/(self.dx**2) \
+ (self.a[i,j + 1] - 2.0*self.a[i, j] + self.a[i, j-1])/(self.dy**2)
使用 ti.static() ,这可以简化为:
@ti.kernel
def compute_laplacian(self):
a,b,dx,dy = ti.static(self.a,self.b,self.dx,self.dy)
for i,j in a:
b[i,j] = (a[i+1, j] - 2.0*a[i, j] + a[i-1, j])/(dx**2) \
+ (a[i, j+1] - 2.0*a[i, j] + a[i, j-1])/(dy**2)
注解
ti.static 还可与 if``(编译时分支)和 ``for (编译时展开)结合使用。 更多相关详细信息,请参见 Metaprogramming 。
在这里,我们将其用于 编译时常量值 ,即 张量/函数句柄 在编译时是常量。
开发者安装指南
Note this is for the compiler developers of the Taichi programming language. End users should use the pip packages instead of building from source. To build with NVIDIA GPU support, CUDA 10.0+ is needed. This installation guide works for Ubuntu 16.04+ and OS X 10.14+. For precise build instructions on Windows, please check out appveyor.yml, which does basically the same thing as the following instructions. We use MSBUILD.exe to build the generated project. Please note that Windows could have multiple instances of MSBUILD.exe shipped with different products. Please make sure you add the path for MSBUILD.exe within your MSVS directory and make it a higher priority (for instance than the one shipped with .NET).
请注意 clang 是在Linux/OS X下唯一支持的可以编译Taichi编译器的编译器。而在Windows下只有MSVC是支持的编译器。
Installing Dependencies
请确认你在使用 Python 3.6/3.7/3.8
Install Python dependencies:
python3 -m pip install --user setuptools astpretty astor pybind11 Pillow dill python3 -m pip install --user pytest pytest-rerunfailures pytest-xdist yapf python3 -m pip install --user numpy GitPython coverage colorama autograd
Make sure you have
clangwith version >= 7:- On Windows: Download clang-10.
Make sure you add the
binfolder containingclang.exeto thePATHenvironment variable. - On OS X: you don’t need to do anything.
- On Ubuntu, execute
sudo apt install libtinfo-dev clang-8. - On Arch Linux, execute
sudo pacman -S clang. (This isclang-10). - On other Linux distributions, please search this site for clang version >= 7.
- On Windows: Download clang-10.
Make sure you add the
Make sure you have LLVM 10.0.0. Note that Taichi uses a customized LLVM so the pre-built binaries from the LLVM official website or other sources probably won’t work. Here we provide LLVM binaries customized for Taichi, which may or may not work depending on your system environment:
注解
On Windows, if you use the pre-built LLVM for Taichi, please add $LLVM_FOLDER/bin to PATH.
Later, when you build Taichi using CMake, set LLVM_DIR to $LLVM_FOLDER/lib/cmake/llvm.
If the downloaded LLVM does not work, please build from source:
On Linux or OS X:
wget https://github.com/llvm/llvm-project/releases/download/llvmorg-10.0.0/llvm-10.0.0.src.tar.xz tar xvJf llvm-10.0.0.src.tar.xz cd llvm-10.0.0.src mkdir build cd build cmake .. -DLLVM_ENABLE_RTTI:BOOL=ON -DBUILD_SHARED_LIBS:BOOL=OFF -DCMAKE_BUILD_TYPE=Release -DLLVM_TARGETS_TO_BUILD="X86;NVPTX" -DLLVM_ENABLE_ASSERTIONS=ON # If you are building on NVIDIA Jetson TX2, use -DLLVM_TARGETS_TO_BUILD="ARM;NVPTX" make -j 8 sudo make install # Check your LLVM installation llvm-config --version # You should get 10.0.0
On Windows:
# LLVM 10.0.0 + MSVC 2019 cmake .. -G"Visual Studio 16 2019" -A x64 -DLLVM_ENABLE_RTTI:BOOL=ON -DBUILD_SHARED_LIBS:BOOL=OFF -DCMAKE_BUILD_TYPE=Release -DLLVM_TARGETS_TO_BUILD="X86;NVPTX" -DLLVM_ENABLE_ASSERTIONS=ON -Thost=x64 -DLLVM_BUILD_TESTS:BOOL=OFF -DCMAKE_INSTALL_PREFIX=installed
- Then open
LLVM.slnand use Visual Studio 2017+ to build. - Please make sure you are using the
Releaseconfiguration. After building theINSTALLproject (under folderCMakePredefinedTargetsin the Solution Explorer window). - If you use MSVC 2019, make sure you use C++17 for the
INSTALLproject. - After the build is complete, find your LLVM binaries and headers in
build/installed.
Please add
build/installed/bintoPATH. Later, when you build Taichi usingCMake, setLLVM_DIRtobuild/installed/lib/cmake/llvm.- Then open
安装并配置CUDA(可选)
如果你没有安装CUDA,请到 英伟达官网 下载安装器。
- 请运行
nvcc —version或cat /usr/local/cuda/version.txt来检查CUDA是否已安装成功。 - 在 Ubuntu 下我们推荐选择
deb (local)来作为 安装器类型(Installer Type)。 - 在 Arch Linux 下,你可以轻松地通过
pacman -S cuda来安装CUDA并跳过手动下载安装器的环节。
开发者的 Taichi 配置
Set up environment variables for Taichi:
On Linux / OS X, please add the following script to your rc file (
~/.bashrc,~/.zshrcor etc. , same for other occurrences in this documentation):export TAICHI_REPO_DIR=/path/to/taichi # Path to your taichi repository export PYTHONPATH=$TAICHI_REPO_DIR/python:$PYTHONPATH export PATH=$TAICHI_REPO_DIR/bin:$PATH # export CXX=/path/to/clang # Uncomment if you encounter issue about compiler in the next step. # export PATH=/opt/llvm/bin:$PATH # Uncomment if your llvm or clang is installed in /opt
Then execute
source ~/.bashrcto reload shell config.On Windows, please add these variables by accessing your system settings:
- Add
TAICHI_REPO_DIRwhose value is the path to your taichi repository so that Taichi knows you’re a developer. - Add or append
PYTHONPATHwith%TAICHI_REPO_DIR%/pythonso that Python imports Taichi from the local repo. - Add or append
PATHwith%TAICHI_REPO_DIR%/binso that you can useticommand. - Add or append
PATHwith path to LLVM binary directory installed in previous section.
- Add
请 递归地 克隆 Taichi 代码库,然后构建:
git clone https://github.com/taichi-dev/taichi --depth=1 --branch=master cd taichi git submodule update --init --recursive --depth=1 mkdir build cd build cmake .. # On Linux / OS X, if you do not set clang as the default compiler # use the line below: # cmake .. -DCMAKE_CXX_COMPILER=clang # # Alternatively, if you would like to set clang as the default compiler # On Unix CMake honors environment variables $CC and $CXX upon deciding which C and C++ compilers to use make -j 8
Check out
examplesfor runnable examples. Run them with commands likepython3 examples/mpm128.py.执行
python3 -m taichi test来运行所有的测试。运行所有测试用例可能会耗费长达5分钟的时间。
Troubleshooting Developer Installation
If
makefails to compile and reportsfatal error: 'spdlog/XXX.h' file not found, please try runinggit submodule update --init --recursive --depth=1.If importing Taichi causes
FileNotFoundError: [Errno 2] No such file or directory: '/root/taichi/python/taichi/core/../lib/taichi_core.so' -> '/root/taichi/python/taichi/core/../lib/libtaichi_core.so'``
Please try adding
TAICHI_REPO_DIRto environment variables, see Setting up Taichi for development.If the build succeeded but running any Taichi code results in errors like
Bitcode file (/tmp/taichi-tero94pl/runtime//runtime_x64.bc) not found, please double checkclangis in yourPATH:clang --version # version should be >= 7and our Taichi configured
llvm-as:llvm-as --version # version should be >= 8 which llvm-as # should be /usr/local/bin/llvm-as or /opt/XXX/bin/llvm-as, which is our configured installation
If not, please install
clangand build LLVM from source with instructions above in Developer installation, then add their path to environment variablePATH.If you encounter other issues, feel free to report by opening an issue on GitHub. We are willing to help!
See also Troubleshooting for issues that may share with end-user installation.
Docker
For those who prefer to use Docker, we also provide a Dockerfile which helps setup the Taichi development environment with CUDA support based on Ubuntu docker image.
注解
In order to follow the instructions in this section, please make sure you have the Docker DeskTop (or Engine for Linux) installed and set up properly.
Build the Docker Image
From within the root directory of the taichi Git repository, execute docker build -t taichi:latest . to build a
Docker image based off the local master branch tagged with latest. Since this builds the image from source, please
expect up to 40 mins build time if you don’t have cached Docker image layers.
注解
In order to save the time on building Docker images, you could always visit our Docker Hub repository and pull the versions of pre-built images you would like to use. Currently the builds are triggered per taichi Github release.
For example, to pull a image built from release v0.6.17, run docker pull taichidev/taichi:v0.6.17
Use Docker Image on macOS (cpu only)
- Make sure
XQuartzandsocatare installed:
brew cask install xquartz
brew install socat
- Temporally disable the xhost access-control:
xhost + - Start the Docker container with
docker run -it -e DISPLAY=$(ipconfig getifaddr en0):0 taichidev/taichi:v0.6.17 - Do whatever you want within the container, e.g. you could run tests or an example, try:
ti testorti example mpm88 - Exit from the container with
exitorctrl+D - [To keep your xhost safe] Re-enable the xhost access-control:
xhost -
Use Docker Image on Ubuntu (with CUDA support)
- Make sure your host machine has CUDA properly installed and configured. Usually you could verify it by running
nvidia-smi - Make sure ` NVIDIA Container Toolkit <https://github.com/NVIDIA/nvidia-docker>`_ is properly installed:
distribution=$(. /etc/os-release;echo $ID$VERSION_ID)
curl -s -L https://nvidia.github.io/nvidia-docker/gpgkey | sudo apt-key add -
curl -s -L https://nvidia.github.io/nvidia-docker/$distribution/nvidia-docker.list | sudo tee /etc/apt/sources.list.d/nvidia-docker.list
sudo apt-get update && sudo apt-get install -y nvidia-container-toolkit
sudo systemctl restart docker
- Make sure
xorgis installed:sudo apt-get install xorg - Temporally disable the xhost access-control:
xhost + - Start the Docker container with
sudo docker run -it --gpus all -e DISPLAY=$DISPLAY -v /tmp/.X11-unix:/tmp/.X11-unix taichidev/taichi:v0.6.17 - Do whatever you want within the container, e.g. you could run tests or an example, try:
ti testorti example mpm88 - Exit from the container with
exitorctrl+D - [To keep your xhost safe] Re-enable the xhost access-control:
xhost -
警告
The nature of Docker container determines that no changes to the file system on the container could be preserved once you exit from the container. If you want to use Docker as a persistent development environment, we recommend you mount the taichi Git repository to the container as a volume and set the Python path to the mounted directory.
开发与贡献指南
首先,感谢你的参与和贡献!我们欢迎一切形式的贡献,包括但不限于
- 修复 BUG
- 提出和实现新功能
- 对本文档进行改进和翻译(欢迎前往 Taichi 中文文档)
- 完善错误时的提示,使之对用户更友好
- 提交新的测试用例
- 提交新的样例程序
- 提交编译器性能补丁
- 发布有关 Taichi 的博客文章和教程
- 加入我们的 Taichi 论坛
- 向你的朋友们介绍 Taichi 或者直接在 GitHub 上星标 Taichi 也可以。
- 修复文档,代码,注释中的拼写错误(像这样的小问题请直接创建一个 PR 而不必开一个 issue)
如何参与 BUG 修复,添加新特性
标记了 “good first issue” 的 issue 是较容易上手的。
- 请先在这个 issue 中留下一句评论(比如: 我知道怎么解决这个,我乐意帮忙! )。这样大家就知道已经有人在解决这个问题了,从而避免重复劳动;
- 如果没有核心开发成员说明一个 issue 可能的解决方案,请简要地描述你的方案,并在你开始之前静候开发成员的回复,从而保障实现的简洁高效。
标记了 “welcome contribution” 的 issue 相比之下更有挑战性但对新手仍然是比较友好的。
进阶指导
- 切实解决问题是我们的最终目标。
- 不要小题大做:用 简单 的方案去解决简单的问题,这样你可以抽出时间和精力处理那些真正困难的问题。
- 几乎每一个设计都有两面性。如果利大于弊,那就可以看作是一个 好的决定 ,请务必权衡利弊。
- 调试是很困难的,每一次的改动应该很小,这样 BUG 的源头就可以很容易地找到。
- 单元/集成测试是我们的好伙伴。
注解
“软件设计过程中中存在两种模式:一种是使之结构简单明了到没有任何问题,另一种是令结构设计足够复杂到完美无缺 而第一种方案则要困难的多.” — C.A.R. 霍尔
需要记住的一点是,Taichi 最初作为一个学术研究项目而诞生。这通常意味着有些部分没有机会经过稳固坚实的设计。虽然我们一直在努力提高代码质量,但这并不意味着项目能没有技术负债。有些地方仍可能会过于复杂而让人感到困惑。一旦你发现这种情形的存在,非常欢迎给我们提出 PR!:-)
高效率地沟通
- 传达了多少有效信息,比打了多少字重要的多。
- 在沟通中保持积极,礼貌,注意语言的组织性、准确性。
- 注意除了文字之外,列表(Bulleted lists)也是我们表达过程中的好伙伴。
- 提交评论前请仔细预读:如果你是读者,你能读懂自己所写的内容么?
- 如果你的母语不是英语,考虑使用拼写检查器,如 Grammarly 。
请根据事实进行讨论与反馈,而不是个人感觉。对我们所有人来说,保持一个友好、零责备的社区环境是非常重要的。一些例子如下:
小技巧
(可接受的表达方式)这种设计可能会让 Taichi 的初学者感到困惑。
警告
(不可接受的表达方式)这种设计真是太糟糕了。
提交良好的 PR
- 我们鼓励改动很小的 PR, 一个 PR 理想情况下应该 只针对一个问题(issue) 。
- 也可以掺杂一些 无关紧要 的优化重构,比如修正笔误;
- 审稿人保留要求 PR 作者删除一些 无关紧要 的改动的权利。
- PR 中的所有 commit 都应被 压缩&合并到 master 分支的一个 commit 里 。
- 为保留清晰的提交日志 PR 作者 不应该将多条 commit 压缩(squash)后提交;
- 当实现一个复杂的特性时,考虑将其分散为许多个小 PR,从而保证更具细节的开发时间线,保证与开发者更频繁的沟通。
- 如果你想更及时的得到核心开发成员的反馈
- 通过 GitHub 的 Draft 状态开一个 PR,这样就可以和我们实时分享你的进展了;
- 请确保在评论中 @ 相应开发成员,或者使用请求评审(request the review)。
- 如果你同时在处理多个 PR
- 互不依赖的 PR 都应该是基于
master衍生出的 不同 分支; - 互相依赖的 PR 应该在所有前置 PR 合并入
master后再进行提出。
- 互不依赖的 PR 都应该是基于
- 所有 PR 理想情况下都应该伴随着相应的 测试;
- 除了内部编译器的实现外,其余的 PR 都应该带有与其功能相对应的 文档更新(documentation update);
- 所有 PR 必须通过 持续集成测试(continuous integration tests) 后才能被合并;
- PR 的标题应当按照 PR title format and tags 的要求编写;
- 除此之外,谷歌有篇相当棒的文章 how to have your PR merged quickly. [PDF] 可供参考
审核与 PR 的合并
- 请按照以下几个来自谷歌的建议
- 合并操作应当始终将 PR 压缩&合并 到主分支(默认为master)上;
- 主分支要求记录 线性历史;
- 确保 PR 能够顺利通过 持续集成测试,文档更新等情况除外;
- 确保标题遵循 PR title format and tags 的要求。
持续集成的运用
规范代码结构
在本地,可以通过在命令行中运行
ti format来自动格式化代码。请注意,在使用ti format之前,您必须在本地安装clang-format-6.0和yapf v0.29.0。如果不想在本地安装这些格式化工具,也可以使用 格式化服务器(format server) 。这是个
ti format的在线版本。- 访问 http://kun.csail.mit.edu:31415/,并点击选取所需格式化的 PR id。
- 回到 PR 页面,你将看到一个名为 @taichi-gardener (机器人) 的用户推送了一个名为
[skip ci] enforce code format的提交。 - 如果你没能找到机器人的提交,说明没有发现任何不规范的代码格式,。
- 然后在本地分支中运行
git pull来提取格式化代码。 - 值得留意的是,备注带有为
[format]的提交信息将自动触发格式化服务。例如:[format] our commit message
PR 标题格式和标签
PR 标题将成为 master 分支中提交历史的一部分,因此保证 PR 标题的可读性非常重要。
请务必在 PR 标题前附加上至少一个标签,如
[Metal]等:
- 当使用多个标签时,确保标签之间只留有一个空格分隔;
- 例如,
[Metal][refactor]``(没有空格)应该被格式化为 ``[Metal] [refactor];PR 标题主干部分的首字母应该大写:
- 例如,
[doc] improve documentation应该被格式化为[doc] Improve documentation;- 同时,
[Lang] “ti.sqr(x)” is now deprecated是可以的,因为“是一个符号。请不要在 PR 标题中包括反引号 (“`”)。
例如,“[Metal] Support bitmasked SNode”,“[OpenGL] AtomicMin/Max support”,或 “[Opt] [IR] Enhanced constant folding”。
常用的标签:
[Metal], [OpenGL], [CPU], [CUDA]: backends;[LLVM]: CPU 和 CUDA 共享的 LLVM 后端;[Lang]: 前端语法特性,包括语法糖;[Std]: 标准库,例如ti.Matrix和ti.Vector;[IR]: 中间表示(intermediate representation, IR);[Opt]: IR 优化迭代轮数;[GUI]: 内嵌的 GUI 系统;[Refactor]: 代码重构优化;[CLI]: 命令行接口, 例如ti命令;[Doc]: 与docs/目录下的文档相关;[Example]: 与examples/目录下的样例程序相关;[Test]: 与tests/目录下增加和改进测试程序相关;[Linux]: 与Linux 平台有关;[Mac]: 与Mac OS X 平台有关;[Windows]: 与Windows 平台有关;[Perf]: 性能改进;[Misc]: 难以归类的杂项,如版本跳跃,格式优化;[Bug]: 修复 Bug;- 在 misc/prtags.json 中查看更多标签.
- 在引进新标签时,请在首先使用该标签的 PR 中一并更新
misc/prtags.json列表,以便其余成员跟随使用。
注解
我们感谢所有的贡献,但是我们不应该把每一个 PR 的标题暴露给终端用户。因此,应该将变更日志分类成 用户应该知道什么 和 开发人员正在做什么 是必要的。而这是通过 大写 PR 标签 区分的:
- 对用户可见/值得注意的 PR,应该将其一开始的标签以 大写的首字母 进行标记,例如
[Metal], [OpenGL], [IR], [Lang], [CLI]。在发布新版本时,脚本(python/taichi/make_changelog.py)将生成一个突出显示这些更改(PR 标题)的变更日志。因此,确保终端用户能够理解你的 PR 所做的工作是非常 重要 的,而这都是 基于你的PR标题。- 其他类型的 PR(底层开发/中间实现)应该使用 全小写字母 的标签 :例如
[metal], [opengl], [ir], [lang], [cli]。- 由于发布更新日志的生成方式,PR 标题中应该 最多只有一个大写标记,以防止重复的 PR 突出显示。例如,
[GUI] [Mac] Support modifier keys(#1189) 就是一个反例, 我们应该用[gui] [Mac] Support modifier keys in GUI来替代。 请只大写与 PR 内容最相关的标签。
C++ 和 Python 标准
Taichi 的 C++ 模块是基于 C++ 17编写的,Python 模块是基于3.6+编写的。所以你可以合理认为 C++ 17和 Python 3.6 特性总是可用的。
Taichi 编译器的开发建议
阅读 Life of a Taichi kernel 这一章也许有助于你理解我们的工作。它解释了整个编译过程。
如果你的工作涉及 IR 优化,请参见 基准测试和回归测试 。
使用 ti.init(arch=desired_arch, **kwargs) 创建 Taichi 程序时,传入以下参数,可以使 Taichi 编译器打印出 IR:
print_preprocessed = True:打印前端 Python AST 转换的结果。结果脚本(resulting scripts)在执行时将生成一个 Taichi 前端 AST。print_ir = True:打印内核编译(不包括访问器)中的 Taichi IR 转换过程。print_accessor_ir = True:打印数据访问器的 IR 转换过程,这是一种特殊而简单的内核信息。(不过很少使用,除非你正在调试数据访问器相关的编译)print_struct_llvm_ir = True: 保存由 Taichi 结构编译器生成的 LLVM IR。print_kernel_llvm_ir = True: 保存由 Taichi 内核编译器生成的 LLVM IR。print_kernel_llvm_ir_optimized = True:保存每个内核优化的 LLVM IR。print_kernel_nvptx = True:保存每个内核生成的 NVPTX(仅限 CUDA)。
注解
Python 作用域中的数据访问器被实现为特殊的 Taichi 内核。例如,x[1, 2, 3] = 3 将调用 x 的写访问器内核, print(y[42]) 将调用 y 的读访问器内核。
目录结构
关键文件包括
taichi: 核心编译器实现program: 上层结构ir: 中间表示analysis: 静态分析transforms: IR 转换传递(Passes)inc: Small definition files to be included repeatedlyjit: Just-In-Time compilation base classesllvm: LLVM utilitiesruntime: LLVM runtime environmentsstruct: 结构编译器基类codegen: 代码生成基类backends: 基于设备的代码生成/运行时环境cpu: CPU backend implementationcuda: CUDA backend implementationopengl: OpenGL backend implementationmetal: Metal backend implementationcc: C backend implementation (WIP)
gui: GUI systemmath: Math utilitiespython: C++/Python 接口platform: 平台支持依赖system: 操作系统相关的基础结构util: 各种各样的工具
python/taichi: Python frontend implementationcore: Loading & interacting with Taichi corelang: Python-embbed Taichi language & syntax (major)misc: Miscellaneous utilitiestools: Handy end-user tools
tests: Functional testspython: Python tests (major)cpp: C++ tests
examples: 样例程序docs: 文档benchmarks: 性能基准external: External librariesmisc: 零散(但仍很有用)的文件…
测试
Tests should be added to tests/.
Command line tools
- 通过使用
ti test运行所有测试实例。 - 通过使用
ti test -v查看详细输出信息。 - 通过使用
ti test -C运行测试并记录代码覆盖率, 参阅 Code coverage 查看更多信息. - Use
ti test -a <arch(s)>for testing against specified backend(s). e.g.ti test -a cuda,metal. - Use
ti test -na <arch(s)>for testing all architectures excluding some of them. e.g.ti test -na opengl,x64. - Use
ti test <filename(s)>to run specific tests in filenames. e.g.ti test numpy_iowill run all tests intests/python/test_numpy_io.py. - Use
ti test -cto run only the C++ tests. e.g.ti test -c alg_simpwill runtests/cpp/test_alg_simp.cpp. - Use
ti test -k <key>to run tests that match the specified key. e.g.ti test linalg -k "cross or diag"will run thetest_crossandtest_diagintests/python/test_linalg.py.
或者使用 ti test -h 查看更多选项。
For more details on how to write a test case, see write_test.
文档
Documentations are put under the folder docs/.
- We use reStructured text (.rst) to write documentation.
- We host our documentation online using readthedocs.io.
- 使用
ti doc建立本地文档。 - Open the documentation at
docs/build/index.html.
注解
在 Linux/OS X 下, 使用 watch -n 1 ti doc 以持续地构建文档。
如果 OpenGL 后端检测器一直在创建新窗口,对 ti doc 附加执行 export TI_WITH_OPENGL=0 。
升级 CUDA
目前我们的开发工作是针对 CUDA 10。在升级 CUDA 版本时,当前 external/cuda_libdevice/slim_libdevice.10.bc 文件应该被新的版本的所取代。
To generate the slimmed version of libdevice based on a full libdevice.X.bc file from a CUDA installation,
use ti task make_slim_libdevice [libdevice.X.bc file]
Workflow for writing a Python test
Normally we write functional tests in Python.
- We use pytest for our Python test infrastructure.
- Python tests should be added to
tests/python/test_xxx.py.
For example, you’ve just added a utility function ti.log10.
Now you want to write a test, to test if it functions properly.
Adding a new test case
Look into tests/python, see if there’s already a file suit for your test.
If not, feel free to create a new file for it :)
So in this case let’s create a new file tests/python/test_logarithm.py for simplicity.
Add a function, the function name must be started with test_ so that pytest could find it. e.g:
import taichi as ti
def test_log10():
pass
Add some simple code make use of our ti.log10 to make sure it works well.
Hint: You may pass/return values to/from Taichi-scope using 0-D tensors, i.e. r[None].
import taichi as ti
def test_log10():
ti.init(arch=ti.cpu)
r = ti.var(ti.f32, ())
@ti.kernel
def foo():
r[None] = ti.log10(r[None])
r[None] = 100
foo()
assert r[None] == 2
Execute ti test logarithm, and the functions starting with test_ in tests/python/test_logarithm.py will be executed.
Testing against multiple backends
The above method is not good enough, for example, ti.init(arch=ti.cpu), means that it will only test on the CPU backend.
So do we have to write many tests test_log10_cpu, test_log10_cuda, … with only the first line different? No worries,
we provide a useful decorator @ti.test:
import taichi as ti
# will test against both CPU and CUDA backends
@ti.test(ti.cpu, ti.cuda)
def test_log10():
r = ti.var(ti.f32, ())
@ti.kernel
def foo():
r[None] = ti.log10(r[None])
r[None] = 100
foo()
assert r[None] == 2
And you may test against all backends by simply not specifying the argument:
import taichi as ti
# will test against all backends available on your end
@ti.test()
def test_log10():
r = ti.var(ti.f32, ())
@ti.kernel
def foo():
r[None] = ti.log10(r[None])
r[None] = 100
foo()
assert r[None] == 2
Cool! Right? But that’s still not good enough.
Using ti.approx for comparison with tolerance
Sometimes the math percison could be poor on some backends like OpenGL, e.g. ti.log10(100)
may return 2.001 or 1.999 in this case.
To cope with this behavior, we provide ti.approx which can tolerate such errors on different
backends, for example 2.001 == ti.approx(2) will return True on the OpenGL backend.
import taichi as ti
# will test against all backends available on your end
@ti.test()
def test_log10():
r = ti.var(ti.f32, ())
@ti.kernel
def foo():
r[None] = ti.log10(r[None])
r[None] = 100
foo()
assert r[None] == ti.approx(2)
警告
Simply using pytest.approx won’t work well here, since it’s tolerance won’t vary among
different Taichi backends. It’ll be likely to fail on the OpenGL backend.
ti.approx also do treatments on boolean types, e.g.: 2 == ti.approx(True).
Great on improving stability! But the test is still not good enough, yet.
Parametrize test inputs
For example, r[None] = 100, means that it will only test the case of ti.log10(100).
What if ti.log10(10)? ti.log10(1)?
We may test against different input values using the @pytest.mark.parametrize decorator:
import taichi as ti
import pytest
import math
@pytest.mark.parametrize('x', [1, 10, 100])
@ti.test()
def test_log10(x):
r = ti.var(ti.f32, ())
@ti.kernel
def foo():
r[None] = ti.log10(r[None])
r[None] = x
foo()
assert r[None] == math.log10(x)
Use a comma-separated list for multiple input values:
import taichi as ti
import pytest
import math
@pytest.mark.parametrize('x,y', [(1, 2), (1, 3), (2, 1)])
@ti.test()
def test_atan2(x, y):
r = ti.var(ti.f32, ())
s = ti.var(ti.f32, ())
@ti.kernel
def foo():
r[None] = ti.atan2(r[None])
r[None] = x
s[None] = y
foo()
assert r[None] == math.atan2(x, y)
Use two separate parametrize to test all combinations of input arguments:
import taichi as ti
import pytest
import math
@pytest.mark.parametrize('x', [1, 2])
@pytest.mark.parametrize('y', [1, 2])
# same as: .parametrize('x,y', [(1, 1), (1, 2), (2, 1), (2, 2)])
@ti.test()
def test_atan2(x, y):
r = ti.var(ti.f32, ())
s = ti.var(ti.f32, ())
@ti.kernel
def foo():
r[None] = ti.atan2(r[None])
r[None] = x
s[None] = y
foo()
assert r[None] == math.atan2(x, y)
Specifying ti.init configurations
You may specify keyword arguments to ti.init() in ti.test(), e.g.:
@ti.test(ti.cpu, debug=True, log_level=ti.TRACE)
def test_debugging_utils():
# ... (some tests have to be done in debug mode)
is the same as:
def test_debugging_utils():
ti.init(arch=ti.cpu, debug=True, log_level=ti.TRACE)
# ... (some tests have to be done in debug mode)
Exclude some backends from test
Sometimes some backends are not capable of specific tests, we have to exclude them from test:
# Run this test on all backends except for OpenGL
@ti.test(excludes=[ti.opengl])
def test_sparse_tensor():
# ... (some tests that requires sparse feature which is not supported by OpenGL)
You may also use the extensions keyword to exclude backends without specific feature:
# Run this test on all backends except for OpenGL
@ti.test(extensions=[ti.extension.sparse])
def test_sparse_tensor():
# ... (some tests that requires sparse feature which is not supported by OpenGL)
开发者工具
This section provides a detailed description of some commonly used utilities for Taichi developers.
日志
Taichi uses spdlog as its logging system. Logs can have different levels, from low to high, they are:
trace
debug
info
warn
error
The higher the level is, the more critical the message is.
The default logging level is info. You may override the default logging level by:
- Setting the environment variable like
export TI_LOG_LEVEL=warn. - Setting the log level from Python side:
ti.set_logging_level(ti.WARN).
In Python, you may write logs using the ti.* interface:
# Python
ti.trace("Hello world!")
ti.debug("Hello world!")
ti.info("Hello world!")
ti.warn("Hello world!")
ti.error("Hello world!")
In C++, you may write logs using the TI_* interface:
// C++
TI_TRACE("Hello world!");
TI_DEBUG("Hello world!");
TI_INFO("Hello world!");
TI_WARN("Hello world!");
TI_ERROR("Hello world!");
If one raises a message of the level error, Taichi will be terminated immediately
and result in a RuntimeError on Python side.
int func(void *p) {
if (p == nullptr)
TI_ERROR("The pointer cannot be null!");
// will not reach here if p == nullptr
do_something(p);
}
注解
For people from Linux kernels, TI_ERROR is just panic.
You may also simplify the above code by using TI_ASSERT:
int func(void *p) {
TI_ASSERT_INFO(p != nullptr, "The pointer cannot be null!");
// or
// TI_ASSERT(p != nullptr);
// will not reach here if p == nullptr
do_something(p);
}
基准测试和回归测试
- 运行
ti benchmark以基准模式运行测试。 这将记录ti test的性能,并将其保存在benchmarks/output中。 - Run
ti regressionto show the difference between the previous result inbenchmarks/baseline. And you can see if the performance is increasing or decreasing after your commits. This is really helpful when your work is related to IR optimizations. - Run
ti baselineto save the benchmark result tobenchmarks/baselinefor future comparison, this may be executed on performance-related PRs, before they are merged into master.
例如,这是启用常数折叠优化传递后 ti regression 输出的一部分:
linalg__________________polar_decomp______________________________
codegen_offloaded_tasks 37 -> 39 +5.4%
codegen_statements 3179 -> 3162 -0.5%
codegen_kernel_statements 2819 -> 2788 -1.1%
codegen_evaluator_statements 0 -> 14 +inf%
linalg__________________init_matrix_from_vectors__________________
codegen_offloaded_tasks 37 -> 39 +5.4%
codegen_statements 3180 -> 3163 -0.5%
codegen_kernel_statements 2820 -> 2789 -1.1%
codegen_evaluator_statements 0 -> 14 +inf%
注解
Currently ti benchmark only supports benchmarking number-of-statements, no time benchmarking is included since it depends on hardware performance and therefore hard to compare if the baseline is from another machine.
We are to purchase a fixed-performance machine as a time benchmark server at some point.
Discussion at: https://github.com/taichi-dev/taichi/issue/948
The suggested workflow for the performance-related PR author to run the regression tests is:
- Run
ti benchmark && ti baselineinmasterto save the current performance as a baseline. - 运行
git checkout -b your-branch-name(分支名称). - 尝试解决问题(第一阶段)。
- 运行
ti benchmark && ti regression获取结果。 - (结果不理想)继续优化直至结果理想。
- (If result OK) Run
ti baselineto save stage 1 performance as a baseline. - 继续进行第二,第三阶段,同时以上的工作流程也同样适用。
程序崩溃时触发GDB(仅限于Linux操作系统)
# Python
ti.set_gdb_trigger(True)
// C++
CoreState::set_trigger_gdb_when_crash(true);
# Shell
export TI_GDB_TRIGGER=1
注解
使用 gdb 快速定位段错误 (segmentation fault) 和断言错误 (assertion failure): 在Taichi 崩溃时,gdb 会被触发并附着到当前的线程上。您可能需要输入和 sudo 超级用户权限相关的密码来允许 gdb 附着到当前的线程上。再输入 gdb 之后, 您可以使用 bt (backtrace)指令检查堆的回溯,从而定位产生错误的代码的具体行数。
Code coverage
To ensure that our tests covered every situation, we need to have coverage report. That is, to detect how many percents of code lines in is executed in test.
- Generally, the higher the coverage percentage is, the stronger our tests are.
- When making a PR, we want to ensure that it comes with corresponding tests. Or code coverage will decrease.
- Code coverage statuses are visible at Codecov.
- Currently, Taichi is only set up for Python code coverage report, not for C++ yet.
ti test -C # run tests and save results to .coverage
coverage report # generate a coverage report on terminal output
coverage html # generate a HTML form report in htmlcov/index.html
序列化(遗留)
Taichi的序列化模块可以允许你将对象序列化/反序列化成二进制字符串。
You can use TI_IO macros to explicitly define fields necessary in Taichi.
// TI_IO_DEF
struct Particle {
Vector3f position, velocity;
real mass;
string name;
TI_IO_DEF(position, velocity, mass, name);
}
// TI_IO_DECL
struct Particle {
Vector3f position, velocity;
real mass;
bool has_name
string name;
TI_IO_DECL() {
TI_IO(position);
TI_IO(velocity);
TI_IO(mass);
TI_IO(has_name);
// More flexibility:
if (has_name) {
TI_IO(name);
}
}
}
// TI_IO_DEF_VIRT();
进展通知(遗留)
当任务完成或崩溃时,taichi消息传递程序可以将邮件发送到 $TI_MONITOR_EMAIL 。 要启用的话:
from taichi.tools import messenger
messenger.enable(task_id='test')
Profiler
Taichi’s profiler can help you analyze the run-time cost of your program. There are two profiling systems in Taichi: ScopedProfiler and KernelProfiler.
ScopedProfiler
ScopedProfilermeasures time spent on the host tasks hierarchically.- This profiler is automatically on. To show its results, call
ti.print_profile_info(). For example:
import taichi as ti
ti.init(arch=ti.cpu)
var = ti.var(ti.f32, shape=1)
@ti.kernel
def compute():
var[0] = 1.0
print("Setting var[0] =", var[0])
compute()
ti.print_profile_info()
ti.print_profile_info() prints profiling results in a hierarchical format.
注解
ScopedProfiler is a C++ class in the core of Taichi. It is not exposed to Python users.
KernelProfiler
KernelProfilerrecords the costs of Taichi kernels on devices. To enable this profiler, setkernel_profiler=Trueinti.init.- Call
ti.kernel_profiler_print()to show the kernel profiling result. For example:
import taichi as ti
ti.init(ti.cpu, kernel_profiler=True)
var = ti.var(ti.f32, shape=1)
@ti.kernel
def compute():
var[0] = 1.0
compute()
ti.kernel_profiler_print()
The outputs would be:
[ 22.73%] jit_evaluator_0_kernel_0_serial min 0.001 ms avg 0.001 ms max 0.001 ms total 0.000 s [ 1x]
[ 0.00%] jit_evaluator_1_kernel_1_serial min 0.000 ms avg 0.000 ms max 0.000 ms total 0.000 s [ 1x]
[ 77.27%] compute_c4_0_kernel_2_serial min 0.004 ms avg 0.004 ms max 0.004 ms total 0.000 s [ 1x]
C++ 代码风格规范
我们大体上遵循 Google C++ 代码风格规范。
命名规则
变量名称应当由小写词语通过下划线连接组成,例如
llvm_context。类和结构体应当由首字母大写的词语组成,例如
CodegenLLVM。请用由
TI开头的形式来命名宏, 例如TI_INFO。- 在碰到不可避免的情况以外我们不提倡在代码中使用宏。
文件名称应当由小写词语通过下划线连接组成, 例如
ir_printer.cpp。
提倡的使用方法
- 在适当的情况下对局部变量添加
auto关键字。 - 在必要的情况下添加
override和const关键字。
不提倡的使用方法
C语言中的既有范式:
printf(请使用fmtlib::print)。new和free。 请使用智能指针(例如std::unique_ptr, std::shared_ptr,而不是手动管理所有关系)。printf(请使用fmtlib::print)。
异常 (我们正在 移除 Taichi 中所有 C++ 异常的使用)。
前缀成员函数,例如
m_,_等。在构造函数和析构函数中调用虚函数。
空指针
NULL。 应当使用nullptr。在全局环境下使用
using namespace std;。typedef。 应当使用using。
自动格式化代码
- 请运行
ti format
内部设计(WIP)
中间表示(Intermediate representation)
使用 ti.init(print_ir=True) 来将中间表示代码输出到控制台。
表生成
Taichi 中的结构 for 循环会以 并行 的方式遍历一个稀疏数据结构中的所有活跃元素。 这把“在稀疏数据结构中均匀分配负载到处理器核心上”这一任务变得十分具有挑战性。具体来说,天真地把一个不规则树分片很容易产生数个叶节点数量严重不均衡的分区。
对此,我们的策略是循序渐进地对于每一层生成(对于该层)活跃的 SNode 元素的表。这个表的计算将发生在和计算正常计算内核的同一个设备上,并且具体取决于在用户调用 ti.init 函数时所提供的 arch 参数。
表的生成将会把数据结构的叶节点展平成一维的稠密数组,并因此规避不完整树的不规则性。然后,我们就可以直接在表上调用一个正常的 并行 for 循环 。
例如,
# misc/listgen_demo.py
import taichi as ti
ti.init(print_ir=True)
x = ti.var(ti.i32)
ti.root.dense(ti.i, 4).bitmasked(ti.i, 4).place(x)
@ti.kernel
def func():
for i in x:
print(i)
func()
以上的代码会生成下面的中间表示(IR)
$0 = offloaded clear_list S1dense
$1 = offloaded listgen S0root->S1dense
$2 = offloaded clear_list S2bitmasked
$3 = offloaded listgen S1dense->S2bitmasked
$4 = offloaded struct_for(S2bitmasked) block_dim=0 {
<i32 x1> $5 = loop index 0
print i, $5
}
请注意, func 的使用会生成以下两个表:
- (任务
$0和$1)基于root节点 (S0)的表会生成一个关于dense节点们(S1)的表;- (任务
$2和$3)基于dense节点们(S1)的表会生成一个关于bitmasked节点们(S2)的表。
关于 root 节点的表总会有且仅有一个元素(实例),所以我们永远不会去清空或者重新生成这个表。
注解
关于 place (叶)节点的表 (比如说,在这个例子里它是 S3 ),永远不会被生成。相反,我们可以遍历关于这些节点的父节点们的表,并且于每个父节点,我们在不生成额外的表的情况下直接遍历所有 place 节点。
这种设计的初衷是去平摊生成表所带来的额外开销。因为去对于每个叶节点(place SNode)生成一个表元素会带来过多的开销,并且这些开销极有可能大大超过在叶元素本身上进行的必要的计算。所以,我们选择只生成和这些叶节点的父节点相关的的元素表,这样就能把生成表所带来的开销平摊到多个倒数第二层的 SNode 元素的子元素上。
在上面的例子中,虽然我们有 16 个关于 x 的实例,但是我们只生成了 4 个 bitmasked 节点(和 1 个 dense 节点)。
代码生成
统计量
在某些情况下,在Taichi程序的执行过程中,收集关于内部事件的特定的量化信息是很用帮助的。Statistics 类就是为此设计的。
用法:
#include “taichi/util/statistics.h”
将1.0加到计数器“codegenoffloaded_tasks”上
taichi::stat.add(“codegen_offloaded_tasks”);
// 将“中间表示”中语句的数量加到计数器“codegen_statements”上
taichi::stat.add(“codegen_statements”, irpass::analysis::count_statements(this->ir));
注意键为 std::string 而值类型为 double。
在Python中使用如下方式来打印出所有的统计量:
ti.core.print_stat()
为什么使用Python作为前端语言
将Taichi嵌入到 Python 中有以下优点:
- 易于学习。Taichi的语法与Python非常相似。
- 易于运行。不需要运行前编译(ahead-of-time compilation)。
- 这样的设计使用户可以重复利用已有的Python基础架构:
- 集成开发环境(IDEs)。大部分Python的集成开发环境提供的语法高亮,语法检查和自动补全功能可以用于Taichi。
- 包管理器(pip)。开发好的Taichi程序可以被简单地提交至
PyPI并且其他用户可以轻松地使用pip安装它。 - 现有的包。用户可以很轻松地与其他Python组件(例如
matplotlib和numpy)交互。
- 只要内核主体可以被Python的解析器解析,那么
Python内置的处理抽象语法树(AST)的工具让我们可以做一些奇妙的事情。
但是,这样的设计同样存在一些不足之处:
- Taichi内核必须能被Python解析器解析。这意味着Taichi的语法不能超出Python的语法范畴。
- 例如,访问Taichi张量时,即使张量是0维度的也必须使用索引。如果
x是0维的,需要使用x[None] = 123来给x中的量赋值。这是因为在Python语法中,x = 123将会将x本身(而不是它包含的值)设为常数123,不幸的是,我们无法更改这种行为。
- 例如,访问Taichi张量时,即使张量是0维度的也必须使用索引。如果
- Python的性能相对较为低下。这在使用纯Python脚本初始化较大Taichi张量时会导致一些性能问题。初始化较大张量时必须使用Taichi内核。
Virtual indices v.s. physical indices
In Taichi, virtual indices are used to locate elements in tensors, and physical indices are used to specify data layouts in memory.
例如,
- In
a[i, j, k],i,j, andkare virtual indices.- In
for i, j in x:,iandjare virtual indices.ti.i, ti.j, ti.k, ti.l, ...are physical indices.- In struct-for statements,
LoopIndexStmt::indexis a physical index.
The mapping between virtual indices and physical indices for each SNode is
stored in SNode::physical_index_position.
I.e., physical_index_position[i] answers the question: which physical index does the i-th virtual index
correspond to?
Each SNode can have a different virtual-to-physical mapping. physical_index_position[i] == -1
means the i-th virtual index does not corrspond to any physical index in this SNode.
SNode s in handy dense tensors (i.e., a = ti.var(ti.i32, shape=(128, 256, 512)))
have trivial virtual-to-physical mapping, e.g. physical_index_position[i] = i.
However, more complex data layouts, such as column-major 2D tensors can lead to SNodes with
physical_index_position[0] = 1 and physical_index_position[1] = 0.
a = ti.var(ti.f32, shape=(128, 32, 8))
b = ti.var(ti.f32)
ti.root.dense(ti.j, 32).dense(ti.i, 16).place(b)
ti.get_runtime().materialize()
mapping_a = a.snode().physical_index_position()
assert mapping_a == {0: 0, 1: 1, 2: 2}
mapping_b = b.snode().physical_index_position()
assert mapping_b == {0: 1, 1: 0}
# Note that b is column-major:
# the virtual first index exposed to the user comes second in memory layout.
Taichi supports up to 8 (constexpr int taichi_max_num_indices = 8) virtual indices and physical indices.
Taichi 开发者讨论会
我们正在举办一系列线上的 TaichiCon(Taichi 讨论会) 活动,让开发人员能够聚集在一起,分享他们使用的 Taichi 经验。
会议流程
目前,每届 TaichiCon 都会包含两个议程: 讲座 与 自由讨论。
- 最初的一个小时包含了4个10分钟的讲座,每个讲座后留有5分钟的问答时间;
- 在所有正式的讲座结束之后,与会者可以自由讨论 Taichi 相关的各个方面。
讨论会的流程以后也许会有所更动。
会议时间及频率
Taichi 开发者分散在世界各地,所以选择一个合适的时间让不同时区的人都能够顺利参会是很重要的。
对位于亚洲和美国的开发者来讲,比较合适的时间是:
- (中国, 北京) 周日 10:00 - 11:00
- (日本, 东京) 周日 11:00 - 12:00
- (新西兰, 惠灵顿) 周日 14:00 - 15:00
- (美国, 东海岸) 周六 22:00 - 23:00
- (美国, 西海岸) 周六 19:00 - 20:00
对位于欧洲的开发者来说,我们也许需要调整到一个更合适的时间。可能没有一个完美的解决方案,所以为了给世界各地的开发者们提供平等的时机,TaichiCons 选择了不同的时间段是很有道理的。
TaichiCon 将会大约每月举办一次。
参加 TaichiCon
欢迎每一位对 Taichi 或相关主题(计算机图形学、编译器、高性能计算、计算流体动力学等)感兴趣的人士参与!
Zoom 会议室可容纳300人。一些注意事项:
- 建议将你在 Zoom 的与会名称修改为统一格式
姓名 (组织)。例如,Yuanming Hu (MIT CSAIL);- 请在其他人发言过程中保持静音,以避免背景噪声干扰;
- 如果你有问题想要提问,请随意在聊天窗口提出;
- 会议结束后将上传会议录屏和幻灯片;
- 与会者在参与 TaichiCon 期间通常不应打开摄像头,这可以为处于不理想网络条件下的其他与会者节省网络带宽。
为 TaichiCon 准备讲座
我们欢迎任何有关 Taichi 的话题,包括但不限于
- API 建议相关(例如,“我认为
Matrix类需要重构。以下是我的想法……”)- 应用程序相关(例如,“我用 Taichi 写了一个新的流体求解器,想要分享…”)
- 集成相关(例如,“这是我如何将 Taichi 集成到 Blender …”)
- 内部设计相关(例如,“如何实现一个新的后端”)
- …
TaichiCon 每轮发言的主体时间为10分钟,每次发言后,接着5分钟的问答时间。如果一轮发言时间累计超过15分钟,主持人可以中断主讲人发言。
组织 TaichiCon
在讨论会开始前需要注意:
- 为会议选择一个合适的时间;
- 与主讲人沟通:询问讲座的 标题,摘要,以及一段简明的 主讲人介绍;
- 在社交网站(Facebook、Twitter、知乎等)进行宣传;
- 确保在会议开始前10分钟,所有的主讲人都已经在(虚拟)会议室就位;
- 如果有主讲人还没到场,试着通过电子邮件提醒他/她参会。
讨论会进行时需要注意:
- 确保 Zoom 会话的全程记录;
- 记得欢迎大家的出席 :-)
- 在每轮发言之前,先介绍发言者;
- 在会议最后,感谢所有的发言者和与会者。
讨论会结束后需要注意:
- 将视频上传到 Youtube 和 Bilibili;
- 收集发言者 PDF 格式的幻灯片;
- 使用每轮发言的首页幻灯片截图制作一张概览图;
- 按照第0届 TaichiCon 的汇总形式更新 TaichiCon 仓库.
- 如果发现有任何能够改善 TaichiCon 工作流程的环节,请更新本页文档。
版本管理与发布
1.0 之前的版本
Taichi 遵循 Semantic Versioning 2.0.0 的标准.
目前 Taichi 还处在1.0.0版本以下的迭代,我们使用次版本变更(例如,0.6.17->0.7.0)来表示 API 的改版,使用补丁版本变更(例如,0.6.9->0.6.10)来代表向后兼容的变化。
工作流:发布新版本
在 Jenkins 上触发 Linux 下的构建,以查看 CUDA 是否通过了所有测试。请注意,我们仅用 Jenkins 进行 CUDA 构建测试。(整个过程可能需要半个小时)
请克隆
master分支的最新一次提交,并为提出 PR 新建一个协助分支。
- 更新
CMakeLists.txt开头的 Taichi 版本号。例如,将SET(TI_VERSION_PATCH 9)改为SET(TI_VERSION_PATCH 10)。- 重新运行 cmake 以更新
docs/version。- 提交说明的格式应该为 “[release] vX.Y.Z”,例如 “[release] v0.6.10”。
- 你应该可以在这次提交中看到有两处更改:一处在
CMakeLists.txt,另一处在docs/version。- 执行
ti changelog并保存其输出。你将会在稍后用到它。
从你刚刚创建的分支发起一个 PR ,PR 的标题应该为 “[release] vX.Y.Z” 。
- 使用你在上一步保存的
ti changelog输出,用它作为 PR 的描述内容。 - 等待所有检查和构建工具完成。(这一步可能需要花费两个小时)。
- 使用你在上一步保存的
合并 PR。
再次触发 Jenkins 上的 Linux 构建,以便将 Linux 包上传到 PyPI。
等待所有构建工具完成工作。这一步将会为 OS X 和 Windows 上传 PyPI 包。你可能需要等待两个小时。
更新
stable分支,使该分支的头(head)指向你在master上刚发布的提交。起草新版本 (在这里进入):
- 标题格式应该为 “vX.Y.Z”。
- 标签格式应该为 “vX.Y.Z”。
- 目标(Target)应该由 “recent commit” -> release commit。
- 发布描述应该从提交时的 PR 描述中复制粘贴过来。
- 点击 “Publish release” 按钮.
常见问题
Q: 用 pip 安装 Taichi 时,报错 package not found 。
A: 你的 Python 版本是否 >= 3.6 并且是 64 位?请参阅 Troubleshooting 。
Q: 我们有提供像 ti.pi 之类的常量吗?
A: 没有,但你可以使用 math.pi 或 numpy.pi 代替。Taichi能够在 JIT 期间处理这些常量,因此内核不会承担运行时成本。
Q: 如何 强制 串行执行最外层的循环,即 不并行化?
A: 试试这个技巧:
for _ in range(1): # 我是最外层循化!
for i in range(100): # 这一层循化不会被并行化
...
Q: 怎样才能最方便地将图像/纹理加载到 Taichi 张量中?
A: 只需使用 tensor.from_numpy(ti.imread('filename.png')) 即可。
Q: Taichi能否像 matplotlib 那样和 其他 Python 包 合作呢?
A: 可以,只要那个包提供 numpy 接口,请参阅 Interacting with other Python packages 。
Q: 我们可以添加一些诸如 ti.smoothstep 或 ti.vec3 之类的便捷函数吗 ?
A: 不必要,因为我们在扩展库 Taichi GLSL 中已经进行了提供,请使用以下命令安装:
python -m pip install taichi_glsl
Q: 如何不用自己编写光线跟踪,就能 渲染出 3D 结果 ?
- A: 你可以使用 Export PLY files 导出模型,接着就可以在 Houdini 或 Blender 中查看了。
- 或者使用扩展库 Taichi THREE 来渲染图像并实时更新到 GUI。
Q: 如何声明具有 动态长度 的张量?
- A: 你想要的可能是
dynamicSNode,这是一种稀疏张量,详见 Working with dynamic SNodes。 - 或者简单地分配足够大的稠密张量,再分配一个 0D 张量
tensor_len[None]用于记录长度。不过事实上,由于维护稀疏信息的成本开销,dynamicSNode 可能比后者慢。
Q: 用户能否在不规则拓扑(例如曲线或四面体网格)而不是常规网格上迭代?
- A: 这些结构必须使用 Taichi 中的 1D 数组表示。接着你就可以通过
for i in x或for i in range(n)迭代遍历它们了。 - 但是,在编译时,Taichi 编译器几乎无法对其优化。不过你仍可以通过调整数据布局,获得不同的运行缓存行为和性能数据。
GUI系统
Taichi具有内置的GUI系统,可帮助用户可视化结果。
创建一个窗口
-
ti.GUI(title, res, bgcolor = 0x000000)¶ 参数: - title – (字符串)窗口标题
- res – (标量或元组)分辨率/窗口大小
- bgcolor – (可选,RGB十六进制)窗口的背景颜色
返回: (GUI)对象代表窗口
创建一个窗口。 如果
res是标量,则宽度将等于高度。以下代码创建了一个分辨率为
640x360的窗口:gui = ti.GUI('Window Title', (640, 360))
-
gui.show(filename = None)¶ 参数: - gui – (GUI)窗口对象
- filename – (可选,字符串)请参阅以下注释
在屏幕上显示窗口。
注解
如果指定了
文件名,则屏幕截图将被保存到该名称指定的文件中。 例如,以下将窗口的框架保存到.png文件中:for frame in range(10000): render(img) gui.set_image(img) gui.show(f'{frame:06d}.png')
在窗口上作画
-
gui.set_image(img)¶ 参数: - gui – (GUI)窗口对象
- img – (numpy 数组或 Taichi 张量)包含图像的张量,请参见下面的注释
设置要在窗口上显示的图像。
图像像素由
img[i, j]的值设定,其中i表示水平坐标(从左到右),j表示垂直坐标(从下到上) 。如果窗口大小是
(x, y),则img必须是以下之一:ti.var(shape=(x, y)),灰度图像ti.var(shape=(x, y, 3)),其中 3 代表(r, g, b)通道ti.Vector(3, shape=(x, y))(参见 向量)np.ndarray(shape=(x, y))np.ndarray(shape=(x, y, 3))
img的数据类型必须是以下之一:uint8,范围[0, 255]uint16,范围[0, 65535]uint32,范围[0, 4294967295]float32,范围[0, 1]float64,范围[0, 1]
注解
When using
float32orfloat64as the data type,imgentries will be clipped into range[0, 1]for display.
-
gui.circle(pos, color = 0xFFFFFF, radius = 1)¶ 参数: - gui – (GUI)窗口对象
- pos – (2元组)圆的位置
- color – (可选,RGB十六进制)颜色填充圆圈
- radius – (可选,标量)圆的半径
画一个实心圆。
-
gui.circles(pos, color = 0xFFFFFF, radius = 1)¶ 参数: - gui – (GUI)窗口对象
- pos – (numpy 数组)一系列圆的位置
- color – (可选,RGB十六进制或 uint32 的 numpy 数组)颜色以填充圆圈
- radius – (可选,float32的标量或np.array)圆的半径(半径)
画多个实心圆。
注解
如果 color 是一个 numpy 数组,则位于 pos[i] 的圆圈将使用 color[i] 作为颜色,因此 color 的数组长度必须与 pos 相同。
-
gui.line(begin, end, color = 0xFFFFFF, radius = 1)¶ 参数: - gui – (GUI)窗口对象
- begin – (2元组)直线的第一个端点位置
- end – (2元组)直线的第二个端点位置
- color – (可选,RGB十六进制)线条颜色
- radius – (可选,标量)线的宽度
画一条线。
-
gui.lines(begin, end, color = 0xFFFFFF, radius = 1)¶ 参数: - gui – (GUI)窗口对象
- begin – (np.array) the positions of the first end point of lines
- end – (np.array) the positions of the second end point of lines
- color – (optional, RGB hex or np.array of uint32) the color(s) of lines
- radius – (optional, scalar or np.array of float32) the width(s) of the lines
Draw lines.
-
gui.triangle(a, b, c, color = 0xFFFFFF)¶ 参数: - gui – (GUI)窗口对象
- a – (2元组)三角形的第一个端点位置
- b – (2元组)三角形的第二个端点位置
- c – (2元组)三角形的第三个端点位置
- color – (可选,RGB十六进制)填充三角形的颜色
画一个实心三角形。
-
gui.triangles(a, b, c, color = 0xFFFFFF)¶ 参数: - gui – (GUI)窗口对象
- a – (np.array) the positions of the first end point of triangles
- b – (np.array) the positions of the second end point of triangles
- c – (np.array) the positions of the third end point of triangles
- color – (optional, RGB hex or np.array of uint32) the color(s) to fill the triangles
Draw solid triangles.
-
gui.rect(topleft, bottomright, radius = 1, color = 0xFFFFFF)¶ 参数: - gui – (GUI)窗口对象
- topleft – (2元组)矩形的左上角位置
- bottomright – (2元组)矩形的右下角位置
- color – (可选,RGB十六进制)描边线的颜色
- radius – (可选,标量)描边线的宽度
画一个空心的矩形。
-
gui.text(content, pos, font_size = 15, color = 0xFFFFFF)¶ 参数: - gui – (GUI)窗口对象
- content – (str) the text to draw
- pos – (tuple of 2) the top-left point position of the fonts / texts
- font_size – (optional, scalar) the size of font (in height)
- color – (optional, RGB hex) the foreground color of text
Draw a line of text on screen.
-
ti.rgb_to_hex(rgb): 参数: rgb – (tuple of 3 floats) The (R, G, B) float values, in range [0, 1] 返回: (RGB hex or np.array of uint32) The converted hex value Convert a (R, G, B) tuple of floats into a single integer value. E.g.,
rgb = (0.4, 0.8, 1.0) hex = ti.rgb_to_hex(rgb) # 0x66ccff rgb = np.array([[0.4, 0.8, 1.0], [0.0, 0.5, 1.0]]) hex = ti.rgb_to_hex(rgb) # np.array([0x66ccff, 0x007fff])
The return values can be used in GUI drawing APIs.
事件处理
Every event have a key and type.
type 是事件的类型,目前只有三种类型的事件:
ti.GUI.RELEASE # key up or mouse button up
ti.GUI.PRESS # key down or mouse button down
ti.GUI.MOTION # mouse motion or mouse wheel
Event key is the key that you pressed on keyboard or mouse, can be one of:
# for ti.GUI.PRESS and ti.GUI.RELEASE event:
ti.GUI.ESCAPE # Esc
ti.GUI.SHIFT # Shift
ti.GUI.LEFT # Left Arrow
'a' # we use lowercase for alphabet
'b'
...
ti.GUI.LMB # Left Mouse Button
ti.GUI.RMB # Right Mouse Button
# for ti.GUI.MOTION event:
ti.GUI.MOVE # Mouse Moved
ti.GUI.WHEEL # Mouse Wheel Scrolling
事件过滤器 是一个由 key,type 和 (type, key) 元组组成的列表,例如:
# 如果按下或释放ESC:
gui.get_event(ti.GUI.ESCAPE)
# 如果按下任何键:
gui.get_event(ti.GUI.PRESS)
# 如果按ESC或释放SPACE:
gui.get_event((ti.GUI.PRESS, ti.GUI.ESCAPE), (ti.GUI.RELEASE, ti.GUI.SPACE))
-
gui.running¶ 参数: gui – (GUI) 返回: (bool) Trueifti.GUI.EXITevent occurred, vice versati.GUI.EXIToccurs when you click on the close (X) button of a window. Sogui.runningwill obtainFalsewhen the GUI is being closed.For example, loop until the close button is clicked:
while gui.running: render() gui.set_image(pixels) gui.show()
You can also close the window by manually setting
gui.runningtoFalse:while gui.running: if gui.get_event(ti.GUI.ESCAPE): gui.running = False render() gui.set_image(pixels) gui.show()
-
gui.get_event(a, ...)¶ 参数: - gui – (GUI)
- a – (可选,事件过滤器)过滤掉匹配的事件
返回: (bool) 如果没有待处理的事件,返回
False,反之亦然尝试从队列中弹出事件,并将其存储在
gui.event中。例如:
if gui.get_event(): print('Got event, key =', gui.event.key)
例如,循环直到按下ESC:
gui = ti.GUI('Title', (640, 480)) while not gui.get_event(ti.GUI.ESCAPE): gui.set_image(img) gui.show()
-
gui.get_events(a, ...)¶ 参数: - gui – (GUI)
- a – (可选,事件过滤器)过滤掉匹配的事件
返回: (生成器)python生成器,请参见下文
基本上与
gui.get_event相同,只不过它返回一个事件生成器,而不是存储到gui.event中:for e in gui.get_events(): if e.key == ti.GUI.ESCAPE: exit() elif e.key == ti.GUI.SPACE: do_something() elif e.key in ['a', ti.GUI.LEFT]: ...
-
gui.is_pressed(key, ...)¶ 参数: - gui – (GUI)
- key – (事件的 key) 您要检测的键
返回: (bool) 其中一个键处于按下状态,返回
True,反之亦然警告
必须与
gui.get_event一起使用,否则将不会更新! 例如:while True: gui.get_event() # must be called before is_pressed if gui.is_pressed('a', ti.GUI.LEFT): print('Go left!') elif gui.is_pressed('d', ti.GUI.RIGHT): print('Go right!')
-
gui.get_cursor_pos()¶ 参数: gui – (GUI) 返回: (2元组)窗口中的当前光标位置 例如:
mouse_x, mouse_y = gui.get_cursor_pos()
GUI Widgets
Sometimes it’s more intuitive to use widgets like slider, button to control program variables instead of chaotic keyboard bindings. Taichi GUI provides a set of widgets that hopefully could make variable control more intuitive:
-
gui.slider(text, minimum, maximum, step=1)¶ 参数: - text – (str) the text to be displayed above this slider.
- minumum – (float) the minimum value of the slider value.
- maxumum – (float) the maximum value of the slider value.
- step – (optional, float) the step between two separate value.
返回: (WidgetValue) a value getter / setter, see
WidgetValue.The widget will be display as:
{text}: {value:.3f}, followed with a slider.
-
gui.label(text)¶ 参数: text – (str) the text to be displayed in the label. 返回: (WidgetValue) a value getter / setter, see WidgetValue.The widget will be display as:
{text}: {value:.3f}.
参数: - text – (str) the text to be displayed in the button.
- event_name – (optional, str) customize the event name.
返回: (EventKey) the event key for this button, see Event processing.
图片输入/输出
-
gui.get_image()¶ 返回: a np.ndarraywhich is the current image shown on the GUI.Get the RGBA shown image from the current GUI system which has four channels.
-
ti.imwrite(img, filename)¶ 参数: - img – (Matrix or Expr) the image you want to export
- filename – (string) the location you want to save to
Export a
np.ndarrayor Taichi tensor (ti.Matrix,ti.Vector, orti.var) to a specified locationfilename.Same as
ti.GUI.show(filename), the format of the exported image is determined by the suffix offilenameas well. Nowti.imwritesupports exporting images topng,imgandjpgand we recommend usingpng.Please make sure that the input image has a valid shape. If you want to export a grayscale image, the input shape of tensor should be
(height, weight)or(height, weight, 1). For example:import taichi as ti ti.init() shape = (512, 512) type = ti.u8 pixels = ti.var(dt=type, shape=shape) @ti.kernel def draw(): for i, j in pixels: pixels[i, j] = ti.random() * 255 # integars between [0, 255] for ti.u8 draw() ti.imwrite(pixels, f"export_u8.png")
Besides, for RGB or RGBA images,
ti.imwriteneeds to receive a tensor which has shape(height, width, 3)and(height, width, 4)individually.Generally the value of the pixels on each channel of a
pngimage is an integar in [0, 255]. For this reason,ti.imwritewill cast tensors which has different datatypes all into integars between [0, 255]. As a result,ti.imwritehas the following requirements for different datatypes of input tensors:- For float-type (
ti.f16,ti.f32, etc) input tensors, the value of each pixel should be float between [0.0, 1.0]. Otherwiseti.imwritewill first clip them into [0.0, 1.0]. Then they are multiplied by 256 and casted to integaters ranging from [0, 255]. - For int-type (
ti.u8,ti.u16, etc) input tensors, the value of each pixel can be any valid integer in its own bounds. These integers in this tensor will be scaled to [0, 255] by being divided over the upper bound of its basic type accordingly.
Here is another example:
import taichi as ti ti.init() shape = (512, 512) channels = 3 type = ti.f32 pixels = ti.Matrix(channels, dt=type, shape=shape) @ti.kernel def draw(): for i, j in pixels: for k in ti.static(range(channels)): pixels[i, j][k] = ti.random() # floats between [0, 1] for ti.f32 draw() ti.imwrite(pixels, f"export_f32.png")
-
ti.imread(filename, channels=0)¶ 参数: - filename – (string) the filename of the image to load
- channels – (optional int) the number of channels in your specified image. The default value
0means the channels of the returned image is adaptive to the image file
返回: (np.ndarray) the image read from
filenameThis function loads an image from the target filename and returns it as a
np.ndarray(dtype=np.uint8).Each value in this returned tensor is an integer in [0, 255].
-
ti.imshow(img, windname)¶ 参数: - img – (Matrix or Expr) the image to show in the GUI
- windname – (string) the name of the GUI window
This function will create an instance of
ti.GUIand show the input image on the screen.It has the same logic as
ti.imwritefor different datatypes.
调试
调试并行程序并不容易,因此Taichi提供了内置的支持,希望能帮助你调试Taichi程序。
内核中的运行时 print
-
print(arg1, ..., sep=' ', end='n')
在 Taichi 作用域内用 print() 调试程序。例如:
@ti.kernel
def inside_taichi_scope():
x = 233
print('hello', x)
#=> hello 233
print('hello', x * 2 + 200)
#=> hello 666
print('hello', x, sep='')
#=> hello233
print('hello', x, sep='', end='')
print('world', x, sep='')
#=> hello233world233
m = ti.Matrix([[2, 3, 4], [5, 6, 7]])
print('m =', m)
#=> m = [[2, 3, 4], [5, 6, 7]]
v = ti.Vector([3, 4])
print('v =', v)
#=> v = [3, 4]
目前,Taichi 作用域的 print 支持字符串、标量、矢量和矩阵表达式作为参数。Taichi 作用域中的 print 可能与 Python 作用域中的 print 略有不同。请参阅下面的详细信息。
警告
对于 CPU 和 CUDA 后端, print 在图形 Python 层(包括 IDLE 和 Jupyter notebook)中不起作用。这是因为这些后端将输出打印到控制台而不是 GUI。如果你希望在 IDLE/ Jupyter 中使用 print ,请使用 OpenGL 或Metal 后端。
警告
对于 CUDA 后端,打印的结果不会显示,直到 ti.sync() 被调用:
import taichi as ti
ti.init(arch=ti.cuda)
@ti.kernel
def kern():
print('inside kernel')
print('before kernel')
kern()
print('after kernel')
ti.sync()
print('after sync')
得到:
before kernel
after kernel
inside kernel
after sync
请注意,主机访问或程序终止也将隐式触发 ti.sync().。
注解
请注意,Taichi 作用域中的 print 只能接收 逗号分隔参数。不应使用 f 字符串或格式化字符串。例如:
import taichi as ti
ti.init(arch=ti.cpu)
a = ti.var(ti.f32, 4)
@ti.kernel
def foo():
a[0] = 1.0
print('a[0] = ', a[0]) # 正确
print(f'a[0] = {a[0]}') # 错误,不支持 f-string
print("a[0] = %f" % a[0]) # 错误, 不支持格式化字符串
foo()
编译时 ti.static_print
有时,在Taichi 作用域中打印 Python 作用域的对象和常量(如数据类型或 SNodes)非常有用。因此,类似于 ti.static ,我们提供 ti.static_print 来打印编译时常数。它类似于 Python 作用域的 print 。
x = ti.var(ti.f32, (2, 3))
y = 1
@ti.kernel
def inside_taichi_scope():
ti.static_print(y)
# => 1
ti.static_print(x.shape)
# => (2, 3)
ti.static_print(x.dtype)
# => DataType.float32
for i in range(4):
ti.static_print(i.dtype)
# => DataType.int32
# 只会打印一次
与 print 不同,ti.static_print 在编译时只打印一次表达式,因此没有运行时成本。
内核中的运行时 assert
程序员可以在 Taichi 作用域内使用 assert 语句。当断言条件失败时, RuntimeError 将被触发以指示错误。
若要使 assert 正常工作,首先请确保使用 CPU 后端 运行程序。其次出于性能方面的考量, assert 仅在 debug 模式开启时有效,例如:
ti.init(arch=ti.cpu, debug=True)
x = ti.var(ti.f32, 128)
@ti.kernel
def do_sqrt_all():
for i in x:
assert x[i] >= 0
x[i] = ti.sqrt(x)
完成调试后,只需设置 debug=False 。此时, assert 将被忽略,并且不会产生运行时开销。
编译时 ti.static_assert
-
ti.static_assert(cond, msg=None)
与 ti.static_print 一样,我们还提供了 assert 的静态版本: ti.static_assert 。对数据类型、维度和形状进行断言可能很有用。无论是否指定 debug=True ,它都有效。当断言失败时,它将引发一个 AssertionError ,就像 Python 作用域中的 assert 一样。
例如:
@ti.func
def copy(dst: ti.template(), src: ti.template()):
ti.static_assert(dst.shape == src.shape, "copy() needs src and dst tensors to be same shape")
for I in ti.grouped(src):
dst[I] = src[I]
return x % 2 == 1
优雅的 Taichi 作用域的栈回溯
我们都知道,Python 提供了一个有用的堆栈回溯系统,它可以帮你轻松找到问题。但有时 Taichi 作用域 的堆栈回溯(stack traceback)日志可能极其复杂且难以阅读。例如:
import taichi as ti
ti.init()
@ti.func
def func3():
ti.static_assert(1 + 1 == 3)
@ti.func
def func2():
func3()
@ti.func
def func1():
func2()
@ti.kernel
def func0():
func1()
func0()
当然,运行此代码将导致 AssertionError :
Traceback (most recent call last):
File "misc/demo_excepthook.py", line 20, in <module>
func0()
File "/root/taichi/python/taichi/lang/kernel.py", line 559, in wrapped
return primal(*args, **kwargs)
File "/root/taichi/python/taichi/lang/kernel.py", line 488, in __call__
self.materialize(key=key, args=args, arg_features=arg_features)
File "/root/taichi/python/taichi/lang/kernel.py", line 367, in materialize
taichi_kernel = taichi_kernel.define(taichi_ast_generator)
File "/root/taichi/python/taichi/lang/kernel.py", line 364, in taichi_ast_generator
compiled()
File "misc/demo_excepthook.py", line 18, in func0
func1()
File "/root/taichi/python/taichi/lang/kernel.py", line 39, in decorated
return fun.__call__(*args)
File "/root/taichi/python/taichi/lang/kernel.py", line 79, in __call__
ret = self.compiled(*args)
File "misc/demo_excepthook.py", line 14, in func1
func2()
File "/root/taichi/python/taichi/lang/kernel.py", line 39, in decorated
return fun.__call__(*args)
File "/root/taichi/python/taichi/lang/kernel.py", line 79, in __call__
ret = self.compiled(*args)
File "misc/demo_excepthook.py", line 10, in func2
func3()
File "/root/taichi/python/taichi/lang/kernel.py", line 39, in decorated
return fun.__call__(*args)
File "/root/taichi/python/taichi/lang/kernel.py", line 79, in __call__
ret = self.compiled(*args)
File "misc/demo_excepthook.py", line 6, in func3
ti.static_assert(1 + 1 == 3)
File "/root/taichi/python/taichi/lang/error.py", line 14, in wrapped
return foo(*args, **kwargs)
File "/root/taichi/python/taichi/lang/impl.py", line 252, in static_assert
assert cond
AssertionError
分析诸如 decorated 和 __call__ 之类晦涩的信息也许能让你的大脑过载着火。其实这些是Taichi 内部堆栈帧。直接暴露它们对普通用户几乎没有好处,并且会使回溯日志很难阅读。
为此,我们可能希望使用 ti.init(excepthook=True) ,这会与异常处理程序 挂钩(hook) ,从而使 Taichi 作用域中的堆栈回溯日志更直观且易于阅读。例如:
import taichi as ti
ti.init(excepthook=True) # just add this option!
...
这样结果会是:
========== Taichi Stack Traceback ==========
In <module>() at misc/demo_excepthook.py:21:
--------------------------------------------
@ti.kernel
def func0():
func1()
func0() <--
--------------------------------------------
In func0() at misc/demo_excepthook.py:19:
--------------------------------------------
func2()
@ti.kernel
def func0():
func1() <--
func0()
--------------------------------------------
In func1() at misc/demo_excepthook.py:15:
--------------------------------------------
func3()
@ti.func
def func1():
func2() <--
@ti.kernel
--------------------------------------------
In func2() at misc/demo_excepthook.py:11:
--------------------------------------------
ti.static_assert(1 + 1 == 3)
@ti.func
def func2():
func3() <--
@ti.func
--------------------------------------------
In func3() at misc/demo_excepthook.py:7:
--------------------------------------------
ti.enable_excepthook()
@ti.func
def func3():
ti.static_assert(1 + 1 == 3) <--
@ti.func
--------------------------------------------
AssertionError
看到了吧?我们的异常挂钩(exception hook)已经从回溯中删除了一些无用的 Taichi 内部堆栈帧。更重要的是,虽然在文档中不可见,但这些输出都是 彩色 的!
注解
对于 IPython / Jupyter notebook 的用户,当 ti.enable_excepthook() 触发时,IPython 原有的堆栈回溯挂钩将被 Taichi 取代。
调试技巧
即使有上面的内置工具,调试 Taichi 程序也可能会很难。在这里,我们展示了一些 Taichi 程序中可能会遇到的常见错误。
静态类型系统
Taichi 作用域中的 Python 代码被翻译成静态类型语言以实现高性能。这意味着Taichi 作用域中的代码与 Python 作用域中的代码可以有不同的行为,尤其是在类型方面。
变量的类型只 在初始化时确定,并且之后不会做更改 。
虽然Taichi的静态类型系统提供更好的性能,但如果程序员不小心使用了错误的类型,它可能会导致错误。例如,
@ti.kernel
def buggy():
ret = 0 # 0 是整数, 所以 `ret` 类型是 int32
for i in range(3):
ret += 0.1 * i # i32 += f32,结果依旧储存在 int32!
print(ret) # 会显示 0
buggy()
上面的代码显示了由于Taichi的静态类型系统而导致的常见错误。Taichi编译器应显示以下警告:
[W 06/27/20 21:43:51.853] [type_check.cpp:visit@66] [$19] Atomic add (float32 to int32) may lose precision.
这意味着Taichi不能将 float32 结果精确存储到 int32 。解决方案是初始化 ret 作为浮点值:
@ti.kernel
def not_buggy():
ret = 0.0 # 0 是浮点数, 所以 `ret` 类型是 float32
for i in range(3):
ret += 0.1 * i # f32 += f32. 成立!
print(ret) # 会显示 0.6
not_buggy()
高级优化
Taichi有一个先进的优化引擎,可以使你的Taichi内核是尽可能快。但是,就像 gcc -O3 一样,高级优化偶尔会导致错误,因为它过于努力了。这包括运行时错误,例如:
`RuntimeError: [verify.cpp:basic_verify@40] stmt 8 cannot have operand 7.`
你可以使用 ti.init(advanced_optimization=False) 关闭高级优化,并查看问题是否仍然存在:
import taichi as ti
ti.init(advanced_optimization=False)
...
无论是否关闭优化修复了问题,请随时在 GitHub 上报告此 Bug。谢谢!
Extension libraries
The Taichi programming language offers a minimal and generic built-in standard library. Extra domain-specific functionalities are provided via extension libraries:
Taichi GLSL
Taichi GLSL is an extension library of Taichi, aiming at providing useful helper functions including:
- Handy scalar functions like
clamp,smoothstep,mix,round. - GLSL-alike vector functions like
normalize,distance,reflect. - Well-behaved random generators including
randUnit2D,randNDRange. - Handy vector and matrix initializer:
vecandmat. - Handy vector component shuffle accessor like
v.xy.
Click here for Taichi GLSL Documentation.
python3 -m pip install taichi_glsl
Taichi THREE
Taichi THREE is an extension library of Taichi to render 3D scenes into nice-looking 2D images in real-time (work in progress).
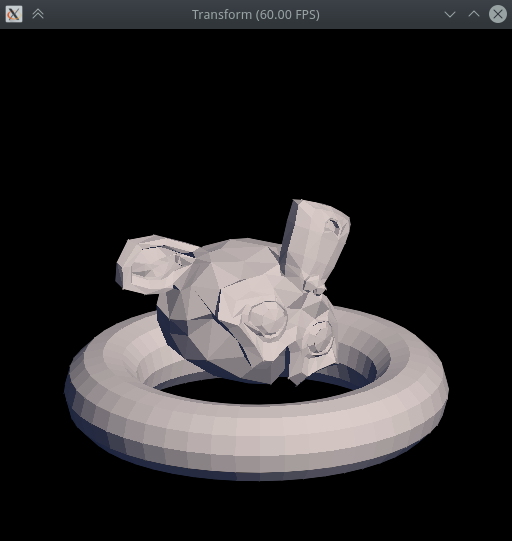
Click here for Taichi THREE Tutorial.
python3 -m pip install taichi_three
导出结果
Taichi 提供的函数可以帮助你以 图像或视频的形式导出可视化结果 。本节文档将对它们的使用方法逐步演示。
导出图像
- 这里有两种方法可以将程序的可视化结果导出为图像。
- 第一种也是较简单的方式是使用
ti.GUI. - 第二种方式是调用一系列相关 Taichi 函数,比如
ti.imwrite.
通过 ti.GUI.show 导出图像
ti.GUI.show(文件名)不仅可以在屏幕上显示 GUI 画布,还可以将 GUI 中的图像保存到指定的文件名中。- 请注意,图像的格式完全由
文件名里的后缀所决定。 - Taichi 现在支持将图片保存为
png,jpg, 和bmp格式。 - 我们建议使用
png格式。例如:
import taichi as ti
import os
ti.init()
pixels = ti.var(ti.u8, shape=(512, 512, 3))
@ti.kernel
def paint():
for i, j, k in pixels:
pixels[i, j, k] = ti.random() * 255
iterations = 1000
gui = ti.GUI(''Random pixels'', res=512)
# mainloop
for i in range(iterations):
paint()
gui.set_image(pixels)
filename = f'frame_{i:05d}.png' # 创建带有 png 后缀的文件名
print(f'Frame {i} is recorded in {filename}')
gui.show(filename) # 导出并显示在 GUI 中
- 运行上述代码后,你将在当前文件夹中获得一系列 png 图像。
通过 ti.imwrite 导出图像
如果不想通过调用 ti.GUI.show(文件名) 保存图像的话,可以使用 ti.imwrite(文件名)。例如:
import taichi as ti ti.init() pixels = ti.var(ti.u8, shape=(512, 512, 3)) @ti.kernel def set_pixels(): for i, j, k in pixels: pixels[i, j, k] = ti.random() * 255 set_pixels() filename = f'imwrite_export.png' ti.imwrite(pixels.to_numpy(), filename) print(f'The image has been saved to {filename}')
ti.imwrite可以导出 Taichi 张量 (ti.Matrix,ti.Vector,ti.var) 和 numpy 张量np.ndarray.- 与之前讲到的
ti.GUI.show(filename)一样, 图像格式 (png,jpg和bmp) 依旧由ti.imwrite(文件名)中文件名包含的后缀所决定. - 同时,得到的图像类型(灰度、RGB 或 RGBA)由 输入张量的通道数 决定。即,第三维的长度(
tensor.shape[2])。 - 换言之,形状是
(w, h)或(w, h, 1)的张量会被导出成灰度图。 - 如果你想导出
RGB或RGBA的图像,输入的张量形状应该分别是(w, h, 3)或(w, h, 4)。
注解
Taichi 中所有的张量都有自己的数据类型,比如 ti.u8 和 ti.f32。不同的数据类型会导致 ti.imwrite 产生不同的输出。请参阅 GUI system 了解更多细节。
- 除了
ti.imwrite之外,Taichi 还提供了其他读取和显示图像的辅助函数。在 GUI system 中也会有它们的示例。
导出视频
注解
Taichi 的视频导出工具依赖于 ffmpeg。如果你的机器上还没有安装 ffmpeg,请按照本节末尾的 ffmpeg 安装说明进行操作。
ti.VideoManager可以帮助你导出 mp4 或 gif 格式的结果。例如,
import taichi as ti
ti.init()
pixels = ti.var(ti.u8, shape=(512, 512, 3))
@ti.kernel
def paint():
for i, j, k in pixels:
pixels[i, j, k] = ti.random() * 255
result_dir = "./results"
video_manager = ti.VideoManager(output_dir=result_dir, framerate=24, automatic_build=False)
for i in range(50):
paint()
pixels_img = pixels.to_numpy()
video_manager.write_frame(pixels_img)
print(f'\rFrame {i+1}/50 is recorded', end='')
print()
print('Exporting .mp4 and .gif videos...')
video_manager.make_video(gif=True, mp4=True)
print(f'MP4 video is saved to {video_manager.get_output_filename(".mp4")}')
print(f'GIF video is saved to {video_manager.get_output_filename(".gif")}')
运行上述代码后,你将在 ./results/ 文件夹中找到输出的视频。
安装 ffmpeg
在 Windows 上安装 ffmpeg
- 从 ffmpeg 上下载
ffmpeg存档文件(具体名称为,ffmpeg-2020xxx.zip); - 解压存档到指定文件夹中,比如, “D:/YOUR_FFMPEG_FOLDER”;
- 关键步骤: 添加路径
D:/YOUR_FFMPEG_FOLDER/bin到环境变量PATH中; - 打开 Windows 下的
cmd或PowerShell,然后输入下面这行命令来测试你的安装是否成功。 如果ffmpeg已经正确安装完毕,那么它的版本信息就会被打印出来。
ffmpeg -version
在 Linux 上安装 ffmpeg
- 大多数 Linux 发行版都会自带
ffmpeg,所以如果你的机器上已经有了ffmpeg命令,那么你就不需要阅读这一部分了。 - 在 Ubuntu 上安装
ffmpeg
sudo apt-get update
sudo apt-get install ffmpeg
- 在 CentOS 和 RHEL 上安装
ffmpeg
sudo yum install ffmpeg ffmpeg-devel
- 在 Arch Linux 上安装
ffmpeg:
- 使用下面这行命令测试你的安装是否成功
ffmpeg -h
导出 PLY 文件
ti.PLYwriter可以帮助你将结果导出为ply格式。下面是导出一个顶点随机着色的立方体动画中10帧画面的短例,
import taichi as ti
import numpy as np
ti.init(arch=ti.cpu)
num_vertices = 1000
pos = ti.Vector(3, dt=ti.f32, shape=(10, 10, 10))
rgba = ti.Vector(4, dt=ti.f32, shape=(10, 10, 10))
@ti.kernel
def place_pos():
for i, j, k in pos:
pos[i, j, k] = 0.1 * ti.Vector([i, j, k])
@ti.kernel
def move_particles():
for i, j, k in pos:
pos[i, j, k] += ti.Vector([0.1, 0.1, 0.1])
@ti.kernel
def fill_rgba():
for i, j, k in rgba:
rgba[i, j, k] = ti.Vector(
[ti.random(), ti.random(), ti.random(), ti.random()])
place_pos()
series_prefix = "example.ply"
for frame in range(10):
move_particles()
fill_rgba()
# 当前只支持通过传递单个 np.array 来添加通道
# 所以需要转换为 np.ndarray 并且 reshape
# 记住使用一个临时变量来存储,这样你就不必再转换回来
np_pos = np.reshape(pos.to_numpy(), (num_vertices, 3))
np_rgba = np.reshape(rgba.to_numpy(), (num_vertices, 4))
# 创建一个 PLYWriter 对象
writer = ti.PLYWriter(num_vertices=num_vertices)
writer.add_vertex_pos(np_pos[:, 0], np_pos[:, 1], np_pos[:, 2])
writer.add_vertex_rgba(
np_rgba[:, 0], np_rgba[:, 1], np_rgba[:, 2], np_rgba[:, 3])
writer.export_frame_ascii(frame, series_prefix)
运行上述代码后,你将在当前工作目录中找到 ply 文件的输出序列。接下来,我们将 ti.PLYWriter 的使用方式分解为4个步骤,并相应的展示一些示例。
- 设置
ti.PLYWriter
# num_vertices 必须是正整数
# num_faces 是可选的,默认为0
# face_type 可以是 "tri" 或 "quad", 默认为 "tri"
# 在之前的例子中,创建了一个带有1000个顶点和0个三角形面片的写入器(writer)
num_vertices = 1000
writer = ti.PLYWriter(num_vertices=num_vertices)
# 在下面的例子中,创建了一个带有20个顶点和5个四边形面片的写入器
writer2 = ti.PLYWriter(num_vertices=20, num_faces=5, face_type="quad")
- 添加必需的通道信息
# 一个由四边形面片组成的二维网格
# y
# |
# z---/
# x
# 19---15---11---07---03
# | | | | |
# 18---14---10---06---02
# | | | | |
# 17---13---19---05---01
# | | | | |
# 16---12---08---04---00
writer = ti.PLYWriter(num_vertices=20, num_faces=12, face_type="quad")
# 对于顶点来说,唯一必需的通道信息就是位置,
# 可以通过向下列函数中传递三个 np.array x,y,z 来添加
x = np.zeros(20)
y = np.array(list(np.arange(0, 4))*5)
z = np.repeat(np.arange(5), 4)
writer.add_vertex_pos(x, y, z)
# 对于面片来说(如果有的话),唯一必需的通道信息是每个面片所包含的顶点索引列表。
indices = np.array([0, 1, 5, 4]*12)+np.repeat(
np.array(list(np.arange(0, 3))*4)+4*np.repeat(np.arange(4), 3), 4)
writer.add_faces(indices)
- 添加可选的通道信息
# 添加自定义顶点通道信息,输入应该包括一个键(key),支持的数据类型,np.array格式的数据
vdata = np.random.rand(20)
writer.add_vertex_channel("vdata1", "double", vdata)
# 添加自定义面片通道信息
foo_data = np.zeros(12)
writer.add_face_channel("foo_key", "foo_data_type", foo_data)
# 错误! 因为 "foo_data_type" 并不是支持的数据类型. 支持的数据类型有如下
# ['char', 'uchar', 'short', 'ushort', 'int', 'uint', 'float', 'double']
# PLYwriter 已经为常用通道定义了几个有用的辅助函数
# 添加顶点的颜色, alpha通道, 及 rgba
# 使用 float/double r g b alpha 来表示颜色值, 范围应该在0到1之间
r = np.random.rand(20)
g = np.random.rand(20)
b = np.random.rand(20)
alpha = np.random.rand(20)
writer.add_vertex_color(r, g, b)
writer.add_vertex_alpha(alpha)
# 相当于
# add_vertex_rgba(r, g, b, alpha)
# 顶点法向
writer.add_vertex_normal(np.ones(20), np.zeros(20), np.zeros(20))
# 顶点索引和块(组内 id)
writer.add_vertex_id()
writer.add_vertex_piece(np.ones(20))
# 添加面片索引和块 (组内 id)
# 在 writer 中索引已有面片并将其通道信息添加到面片通道信息中
writer.add_face_id()
# 将所有的面片都放到第一组
writer.add_face_piece(np.ones(12))
- 导出文件
series_prefix = "example.ply"
series_prefix_ascii = "example_ascii.ply"
# 导出一个简单的文件
# 使用 ascii 编码这样你可以对内容进行概览
writer.export_ascii(series_prefix_ascii)
# 或者,使用二进制编码以获得更好的性能
# writer.export(series_prefix)
# 导出文件序列,即10帧
for frame in range(10):
# 将每一帧写入你的当前运行的文件夹中( 即, "example_000000.ply")
writer.export_frame_ascii(frame, series_prefix_ascii)
# 或者相应的, 使用二进制编码这样写
# writer.export_frame(frame, series_prefix)
# 更新 位置/颜色
x = x + 0.1*np.random.rand(20)
y = y + 0.1*np.random.rand(20)
z = z + 0.1*np.random.rand(20)
r = np.random.rand(20)
g = np.random.rand(20)
b = np.random.rand(20)
alpha = np.random.rand(20)
# 重新填充
writer = ti.PLYWriter(num_vertices=20, num_faces=12, face_type="quad")
writer.add_vertex_pos(x, y, z)
writer.add_faces(indices)
writer.add_vertex_channel("vdata1", "double", vdata)
writer.add_vertex_color(r, g, b)
writer.add_vertex_alpha(alpha)
writer.add_vertex_normal(np.ones(20), np.zeros(20), np.zeros(20))
writer.add_vertex_id()
writer.add_vertex_piece(np.ones(20))
writer.add_face_id()
writer.add_face_piece(np.ones(12))
将 ply 文件导出到 Houdini 和 Blender
Houdini 支持导入一组共享相同前缀/后缀的 ply 文件。我们的 export_frame 就可以为你满足这种需求。在 Houdini 中,点击 File->Import->Geometry 并导航至包含你的框架输出的文件夹中,这些输出结果应该被梳理成一个单一的条目,比如 example_$F6.ply (0-9)。双击该条目以完成导入过程。
Blender 需要一个名为 Stop-motion-OBJ 的插件来加载结果序列。这里有一个非常详尽的 教程视频,是由其作者提供的关于如何安装、授权和使用这个插件的演示。需要注意的一点是,Stop-motion-OBJ 工作流的重大变更是在最近的测试版本中才释放来的。如要跟随他们的说明文档和视频学习和使用,请使用 v2.0.2 版本。
Command line utilities
A successful installation of Taichi should add a CLI (Command-Line Interface) to your system,
which is helpful to perform several rountine tasks quickly. To invoke the CLI, please
run ti or python3 -m taichi.
Examples
Taichi provides a set of bundled examples. You could run ti example -h to print the help
message and get a list of available example names. For instance, to run the basic fractal
example, try: ti example fractal from your shell. (ti example fractal.py should also
work)
Changelog
Sometimes it’s convenient to view the changelog of the current version of Taichi, to do so from
your shell, you could run ti changelog.
全局设置
后端
- To specify which Arch to use:
ti.init(arch=ti.cuda). - To specify pre-allocated memory size for CUDA:
ti.init(device_memory_GB=0.5). - To disable unified memory usage on CUDA:
ti.init(use_unified_memory=False). - 指定 CUDA 所使用的 GPU,请执行以下操作:
export CUDA_VISIBLE_DEVICES=[gpuid]。 - To disable a backend on start up, say, CUDA:
export TI_ENABLE_CUDA=0.
编译
- Disable advanced optimization to save compile time & possible errors:
ti.init(advanced_optimization=False). - Disable fast math to prevent possible undefined math behavior:
ti.init(fast_math=False). - To print preprocessed Python code:
ti.init(print_preprocessed=True). - To show pretty Taichi-scope stack traceback:
ti.init(excepthook=True). - To print intermediate IR generated:
ti.init(print_ir=True).
运行
- 重新启动 Taichi 运行系统(销毁所有张量和内核):
ti.reset()。 - To start program in debug mode:
ti.init(debug=True)orti debug your_script.py. - To disable importing torch on start up:
export TI_ENABLE_TORCH=0.
日志记录
- Show more detailed log to level TRACE:
ti.init(log_level=ti.TRACE)orti.set_logging_level(ti.TRACE). - Eliminate verbose outputs:
ti.init(verbose=False).
开发
- To trigger GDB when Taichi crashes:
ti.init(gdb_trigger=True). - 以 开发模式 缓存编译后运行时位码(compiled runtime bitcode)以节省启动时间:
export TI_CACHE_RUNTIME_BITCODE=1。 - To specify how many threads to run test:
export TI_TEST_THREADS=4orti test -t4.
Specifying ti.init arguments from environment variables
Arguments for ti.init may also be specified from environment variables. For example:
ti.init(arch=ti.cuda)is equivalent toexport TI_ARCH=cuda.ti.init(log_level=ti.TRACE)is equivalent toexport TI_ARCH=trace.ti.init(debug=True)is equivalent toexport TI_DEBUG=1.ti.init(use_unified_memory=False)is equivalent toexport TI_USE_UNIFIED_MEMORY=0.
If both ti.init argument and the corresponding environment variable are specified, then
the one in the environment variable will override the one in the argument, e.g.:
- if
ti.init(arch=ti.cuda)andexport TI_ARCH=openglare specified at the same time, then Taichi will chooseti.openglas backend. - if
ti.init(debug=True)andexport TI_DEBUG=0are specified at the same time, then Taichi will disable debug mode.
注解
If ti.init is called twice, then the configuation in first invocation will be
completely discarded, e.g.:
ti.init(debug=True)
print(ti.cfg.debug) # True
ti.init()
print(ti.cfg.debug) # False
致谢
Taichi 的实现基于其他开源项目,并且会与 taichi 一起安装,无需用户手动下载: pybind11, fmt, Catch2, spdlog, stb_image, stb_image_write, stb_truetype, tinyobjloader, ffmpeg, miniz.
Halide 一直以来都是在我们开发中十分有帮助的一个参考库,方便我们了解 Apple Metal 和 LLVM NVPTX 后端的应用程式介面(API),特此致谢。
Installing the legacy Taichi Library
注解
This is NOT for installing the Taichi programming language. Unless you are building a legacy project
based on the legacy Taichi library (e.g.
taichi_mpm and
spgrid_topo_opt)
you should always install Taichi using pip.
If you are working on the Taichi compiler and need to build from source, see Developer installation.
Supported platforms:
- Ubuntu (gcc 5+)
- Mac OS X (gcc 5+, clang 4.0+)
- Windows (Microsoft Visual Studio 2017)
Make sure you have python 3.5 +.
Ubuntu, Arch Linux, and Mac OS X
wget https://raw.githubusercontent.com/yuanming-hu/taichi/legacy/install.py
python3 install.py
Note, if python complains that a package is missing, simply rerun install.py and the package should be loaded.
Windows
Download and execute this script with python3.
Additional environment variables: (assuming taichi is installed in DIR/taichi)
Set TAICHI_REPO_DIR as DIR/taichi (e.g. E:/repos/taichi).
Add %TAICHI_REPO_DIR%/python to PYTHONPATH, DIR/taichi/bin (e.g. E:/repos/taichi/bin) to PATH.
Restart cmd or PowerShell, and you should be able to run command ti.
Build with Double Precision (64 bit) Float Point
export TC_USE_DOUBLE=1
ti build